The Great British Yorkshire Pudding!

09/16

This week, inspired by The Great British Bake Off, I’ve partnered with AEG to create the quintessential Great British Yorkshire Pudding!

Earlier this year, I received an AEG SteamBake oven, (you can read my review here) and I absolutely love it! The steam cooking keeps the dough moist on the surface to create a golden colour and tasty crust on your bakes, while the centre stays soft and fluffy. Meaning Yorkshire puddings will always be deliciously golden brown!

I created this recipe which makes 10 monster Yorkshires, baked wonderfully in the SteamBake oven, perfect for a Sunday roast! Check out the video below for how they are made.

As well as an excellent oven for baking, the SteamBake oven is also a great all-rounder multifunction oven (with up to 13 functions) that grills, roasts and bakes. Mine also features pyrolytic cleaning, a food probe and soft close door! It was awarded The Good Housekeeping Institute seal of approval after rigorous testing and SteamBake is now available on all AEG single built in ovens at no extra cost.

I’ve used the SteamBake function on my oven for so many different things including Sun-Dried Tomato & Parmesan Loaf, Lemon & White Chocolate Muffins and a Baked Raspberry Cheesecake and the SteamBake function provided excellent results!

There are a 3 simple steps to SteamBake:

Step 1: Pour 100ml of water in the cavity at the bottom

Step 2: Select the SteamBake programme and press the SteamBake button

Step 3: Let the oven preheat and create steam for 5 minutes. Then add your fresh dough after the steam has dissipated.

The cool thing is, it’s not a steam oven as such but a normal built-in multifunction oven, with the added bonus of a SteamBake button.

To find out more, check out the AEG page here.

Happy baking!

Britt xo


This is a sponsored post in partnership with AEG.  All views and opinions are my own.

Jaffa Cakes – The Great British Bake Off

08/16

This week marked the return of The Great British Bake Off! Now in it’s seventh series and still as popular as ever, twelve budding bakers were sent into the terrifying tent in the English countryside to battle against each other for the title of Britain’s Best Amateur Baker, and a pretty fancy cake stand too!

With viewing figures for this first episode beating the most watched moments of the Rio Olympics (GBBO 11.2 million viewers versus Olympics which peaked at 11.1 million), it shows that judges Mary and Paul with hosts Mel & Sue still have a special place in our hearts.

This first week saw the bakers try drizzle cakes, genoise sponge and Jaffa Cakes! (We won’t talk about Paul Hollywood dunking what is clearly a cake into a hot drink…)

Jaffa Cakes, and all things chocolate orange are a firm favourite of mine. So, in a break with the norm I have decided to try my hand at the technical challenge and make Mary Berry’s Jaffa Cakes! I used Mary’s own recipe and recreated it at home. Only doing a couple of things slightly differently than instructed!

On your marks, get set… BAKE!

Firstly, as instructed, I made the jelly. I was stirring those cubes for what felt like FOREVER. Poured into the tray and left to set.

Now, I have a fear of cakes sticking to the inside of tins, which I think formed when I first started baking and everything stuck! So, for my actual cakes, I’m using my muffin tray but I am lining each hole with greaseproof paper and cake release. Some may say excessive, but it’s quite therapeutic for me sitting and cutting out the circles!

I measured out the ingredients for the cakes and was surprised at how little was actually needed. This is no more than a large spoonful of each element and it seemed just too small! However I, of course, put my trust in Mary! Haha! (I wonder if you can buy a t-shirt that says In Mary Berry We Trust?).

Then, I made the cakes following Mary’s recipe to the letter. Filling my wells and then baking at 160°C fan for 10 minutes.

I cooled them on a cooling rack and as I was placing them on, Tim came downstairs and said ‘Ooh! They look like Jaffa Cakes!’ – A good sign.

The instruction was to ‘turn out the jelly onto some greaseproof paper’. This was the hardest part of this. Jelly doesn’t really ‘turn out’. I peeled it off and as you can clearly see, it remained intact. Haha! I ate that bit on the corner just after I took this photo. I love jelly.

Let’s get jaffa-ing!

Circles cut and places and they resemble fried eggs. Haha! Seriously though, it was quite tricky getting the jelly rounds to stay, well… round once places onto the sponge!

Now for the chocolate! I did try to pick them up and spoon them on individually but it was a very hot day and I was getting covered in chocolate, so I decided to pour the chocolate on to make Jaffa Drip Cakes. Ha!

Jaffa Cakes by She Who Bakes

And there we have it – Jaffa Cakes!

They got Tim’s seal of approval and I quote; “They taste like Jaffa Cakes!” Hallelujah!

It took me about 2 hours and was rather fiddly! I don’t think I would do too well in the tent! Haha!

If you want to try these beauties, you can find Mary Berry’s recipe that I used here. Give it a try and let me know how you get on either on Facebook or Twitter or Instagram.

If you want to turn your baking hobby into a career, check out my book Cakes, Bakes & Business for everything you need to know about running a successful baking business, including pricing, marketing, insurance and much more!

Happy baking!

Britt xo

The Cake & Bake Show 2016

08/16

I’m pleased to announce I will be appearing live again at the Cake & Bake Show 2016 in both London and Manchester!

I will be in the Baking & Decorating Classroom, carrying out a practical cake decorating demonstration as well as appearing on ‘A Slice Of Advice’, where I will be hosting a one-hour session answering visitor’s questions!

I am SO excited to be at the show and really looking forward to meeting as many of you as possible! Click the links below for more information and to book your tickets! Please note, ‘A Slice Of Advice’ is included in your show ticket but the class room demonstrations are separate and you must book tickets through the website to attend!

£10 Tickets! 

Use the code CAKE which will allow you to buy tickets at the discounted price of £10 to any of the two shows.* To book go to the website here or call 0844 854 1364.

See you soon and happy baking!

Britt xo

The Cake and Bake Show London 2016

Sunday 9th October – Halloween Cupcakes

14:15 – 15:15 – A Slice of Advice

16:00 – 16:40 – Decorating Classroom

The Cake and Bake Show Manchester 2016

Sunday 13th November – Santa Face Cake

10:30 – 11:10 – Baking and Decorating Classroom

 11:15 – 12:15 – A Slice of Advice

Halloween Cupcakes Santa cake
*T&C’s: Book before 13th November 2016. Concessions not included. £1.75 transaction fee applies per order. For children’s ticket prices please see the website for details. Calls cost 7p per minute plus your phone company’s access charge.

Facebook Live Bake-A-Long!

08/16

This Sunday 7th August at 4pm GMT I will be baking my popular Bourbon Biscuit Bake recipe live on my Facebook page!

You can come and watch me, ask lots of questions, see how I work in my kitchen and the best part is, you can bake a long at home!

The live video will be me making the bake and then I will post a picture when it’s cooled and out of the oven!

The ingredients you will need to do it with me at home are;

  • 250g milk chocolate
  • 125g unsalted butter
  • 250g caster sugar
  • 300g plain flour
  • 4 eggs
  • pack of Bourbon Biscuits

You’ll also need;

  • Bake ingredients
  • 10″ x 8″ tin (a brownie tin will also work!)
  • Greaseproof paper
  • Scissors & pencil
  • Cake release (spray, tub, tube, whatever you’ve got!)
  • Silicone pastry brush
  • Big spoon/spatula
  • Sandwich bag
  • Rolling pin/ something to bash biscuits with
  • An oven!

I look forward to seeing you there!

Britt xo

Peanut Butter Cups

08/16

I’ve put a twist on my classic Peanut Butter Chocolate Squares recipe by transforming it into Peanut Butter Cups!

These homemade, Reese’s style peanut butter cups are sweet and moreish. With only 6 ingredients needed, a tasty peanut butter base, peanut butter chocolate and topped with mini peanut butter cups, it’s a must make for any peanut butter fan!

If you want to turn your baking hobby into a career, check out my book Cakes, Bakes & Business for everything you need to know about running a successful baking business, including pricing, marketing, insurance and much more!

Give it a try and let me know how you get on either on Facebook or Twitter or Instagram.

Happy baking!

Britt xo

Why Do My Cupcake Cases Peel Away? Cupcake Troubleshooting

07/16

Cupcake Troubleshooting

Cupcakes! Sometimes a tasty treat and sometimes, the bane of a baker’s life! Over the years I’ve been asked lots and lots of cupcake conundrums. Below, I’ve answered some of the most popular questions.

I wanted to start with a few hints and tips to baking the perfect cupcake;

  • Use good quality tins. The shallow tin you use for Yorkshire puddings and fairy cakes unfortunately isn’t cut out for the job of a big, sturdy cupcake. I have two Wilton 12 Hole Muffin Tins that I swear by. They are nice and deep and ensure an even bake to your cupcakes. You can pick them up on Amazon here.
  • Use good quality cases. It sounds obvious, but you get what you pay for. If you buy 100 fairy cases for 50p it will be difficult to get a professional finished cupcake. I love the super cute Baking Cups you can buy from Iced Jems here and have always had success with them!
  • Cupcakes are not Fairy Cakes. Cupcakes are usually 1 ½” deep and can be any flavour or colour and usually topped with sugarpaste (icing) or a swirl of buttercream. Fairy Cakes are small, (as in, a cake for a fairy…) vanilla sponge and topped with a blob of glacé icing (icing sugar and water).
  • You don’t need to put cupcakes in a fridge (Or most cakes for that matter). It will only cause your tasty baked goods to dry out, and no one wants that.
  • Buy an oven thermometer. You really don’t know what’s going on inside there until you have a proper look and that can really affect how your cupcakes bake. I’ll talk more about temperature below and you can read more about this subject on my previous post What Temperature Should I Bake At?
  • If you’re baking in advance, you can freeze your cupcakes! Check out my article How To Freeze Cakes for more information.

Why do my cupcake cases peel away?

This is quite a common one and one with a few different answers. Cupcakes are temperamental little things. Moisture and steam are your enemies when making cupcakes. When you bake a batch up cupcakes and take them out of the oven, they start creating steam due to their heat. If you take them out of the tin straight away, the sudden change in temperature can cause quick condensation which causes the cases to peel BUT by leaving them in the tin too long, condensation quickly forms and the cases peel then too!

The way I do it is to take the tin out of the oven and leave it on the side for about a minute. Then I take the cupcakes out and transfer to a wire rack. I then leave them alone until they have gone completely cool. Messing around too much with the cupcakes can also cause the cases to come away but this is more down to force.

Too much moisture in the mix will also make the cases peel. If you are using fresh fruit, too much liquid etc. You need to make sure your mix is nicely balanced. Also, if you store your cupcakes in an airtight container when they haven’t cooled properly, this will again, cause condensation which makes the cases peel.

Storage of your cupcakes can cause an issue too. Don’t store your cupcakes in an airtight tupperware box or plastic container, you are better off storing them in a card cupcake/cake box in a cool, dry place. Finally, bad quality cases will also have an effect on the peeling.

Also, make sure you are using greaseproof cupcake cases or baking cups (available from Iced Jems) which don’t peel and are fantastic!

Why do my cupcake cases go transparent?

This one is SO annoying. You purchase lovely, patterned cases specifically for an occasion, or you manage to get an exact match on the colour for your theme, you bake your cupcakes, take them out of the oven and… oh. Where has the pattern gone?

The main reason for this is grease. When baking, grease will form around the cupcake and settle at the bottom. You need to make sure any cupcake cases you buy have ‘greaseproof‘ written on them, or use baking cups. That will ensure your pattern stays nice and bright.

A tip for this, is to pour a teaspoon of dry rice into each well of your cupcake tin before lining with cases. The rice absorbs any grease on the soggy bottom leaving your cupcakes nice and dry!

Baking Hacks

Why do my cupcakes have a sticky top once the cupcakes cools down?

The sticky top on the cupcake is due to the sugar in the cake attracting moisture (See, it really is the enemy!). You must make sure that if you are storing your cupcakes, not to do so in a completely airtight tin if there is even a chance they might be a little bit warm. Even if they feel cool to the touch, the very middle of the cupcake may not be. The slightest heat in an airtight environment will cause condensation which, as we already know, can cause the cases to peel away, but can also cause a dreaded sticky top.

Moisture in the air doesn’t help, either. On a really hot day in a steamy kitchen, cupcakes can very quickly form a sticky top. (This happened to me in the summer when I couldn’t have my window open to let air in as the gardener next door was mowing very loudly!)

A helpful tip, is to sprinkle a little icing sugar (powdered sugar) onto sticky topped cupcakes, this will absorb any moisture without too much fuss. If it’s super sticky but your cases are staying put and it isn’t causing much of an issue, I wouldn’t worry. It can be covered with a buttercream/sugarpaste (icing) topping and still be enjoyed. No one will know!

Why do my cupcakes have a ‘muffin top’?

Ah. The dreaded muffin top. We don’t want it in our jeans and we don’t want it in our cupcakes! A common cause for this is too much mixture. You want to fill your cases between 2/3 and 3/4 full. I find an easy way to do this is with a large ice cream scoop. Like this one. Any more than this and the rising mixture will just explode! Another reason for muffin tops is too much raising agent, like baking powder.

What temperature should I bake my cupcakes at?

IMG_4291

I bake my cupcakes low and slow. I bake for 140C (fan assisted electric, Gas Mark 1) for about 45 minutes. If you bake hotter than this, you can cause your cupcakes to dry out, peak, crack and burn. By baking using the low and slow method, it ensures an even rise, an even bake and a tasty cupcake!

I have only ever baked with an electric oven, fan assisted so unfortunately I’m not sure how to get the best results from a gas oven but low and slow won’t let you down!

Why do my cupcakes have a peak on top?

As above. A peak is usually caused by an oven that’s too hot! The cake surface is baking quicker than the batter in the middle. This causes it to burst out of the top like a mini volcano. Turn your oven down and try the method above.

Why do my cupcakes sink in the middle?

The main reason for this is that your cupcakes aren’t baked completely. Make sure to keep them in for the time stated on the recipe you are using or until a cocktail stick has come out clean. This one will take practice. Cupcakes can look done but five minutes out of the oven and they start to sink and collapse.

A well baked cupcake should be nicely risen, golden in colour and springy to touch.

Remember…

If cupcakes go wrong, that’s fine. It doesn’t mean you’ve failed. Baking is a science and it only takes the slightest imbalance to mess up a good batch of cupcakes. Try, try, try again. Baking fails are what make us human, we should never be ashamed of them. They show we’ve learnt something. I’m learning every day.

If you want to turn your baking hobby into a career, check out my book Cakes, Bakes & Business for everything you need to know about running a successful baking business, including pricing, marketing, insurance and much more!

Happy baking!

Britt xo

Foolproof Cupcake Recipe

Foolproof Cupcake Recipe

For 12 cupcakes.

  • 200g self raising flour
  • 200g caster sugar
  • 200g Stork/butter
  • 50g plain flour
  • 4 medium eggs
  • 1 tsp vanilla
  1. Cream together the Stork and caster sugar.
  2. Add in your eggs.
  3. Add in your flour.
  4. Add the vanilla.
  5. Mix for 4-6 minutes on a high speed.
  6. Use a large ice cream scoop to put the mixture in the cases.
  7. Bake at 140C for 45 minutes or until golden brown.

Buttercream Recipe

This recipe is great for piping onto cupcakes with!

  • 250g unsalted butter
  • 500g icing sugar
  • 1 tsp vanilla
  1. Cream the butter on it’s own first
  2. Add in the icing sugar and mix well
  3. Finally add the vanilla
Try not to add milk, water etc as this will make the buttercream too soft to pipe with.


Following In My Mum’s Footsteps

07/16

Nothing can prepare you for losing a parent. Articles, magazines, websites, self-help books, they all give you tools and strategies to cope with your loss and not one of them worked for me. They tell you to focus on the good times, remember the happy moments. All of that is tremendously hard when you know you will never hear their voice again.

The day I lost her is one I’ll remember always. Being told she was gone. It hit me like a freight train. I screamed I was being lied to. Of course, I wasn’t. Who would lie about such a thing. I knew she was ill. I knew deep down it was a matter of time, but that doesn’t make it easy. I remember thinking ‘she’ll get better’, I thought she would be cured. But there is no cure for cancer. And day after day families around the world are given the heartbreaking news they will never see their loved one smile again.

This was my mum. My protector. My provider. My world.

I was 16. I was a good kid. I did my homework, I did after school activities, I performed in shows, I made my mum proud. As her only child she loved me with all her being and it was very mutual. Yes, we argued, we had our moments, I was a hormonal teenager. There was a time I used to hate myself going over every argument in the last few months she was alive, but that did me no good. I’ve let go of that now.

That morning, I calmly called my head of year at school and told them I wound’t be returning. I called my mums work and gave them the sad news. I tried to keep organised and busy, as my mum would have wanted me to be. It wasn’t until a few weeks later I broke down and that was when my life spiralled into depression. I make no secret of my battle with my mental health as I tried, and failed, to cope with the loss of my mum. I quit school, I got a job, I carried on. But there’s only so much front you can give when you haven’t properly grieved.

And so I grieved, for years and years. Not fully accepting it. Not wanting it to be true. Going through the denial, the anger, the bargaining and all of the other steps they tell you about on a photocopied leaflet in a fluorescent lit waiting room.

My tale of depression and baking my way out of it is another story. What follows now is something different. This one is for her.

Brought up by my mum who was a single parent, having no siblings and having lost my grandparents as well, there wasn’t many people in my life who I saw every day who knew my mum. Memories and reminiscent conversations were scarce. Photos over the years had been lost and damaged and in the end, I wasn’t left with much.

Last August, on what would have been my mum’s 62nd birthday, I found a picture. One I didn’t remember seeing before. It was of my mum standing outside what looked to be a Tudor building. It intrigued me.  I had no idea when it was taken, where it was or who was with her.  After a quick search of the name on the building, I discovered it was only half an hour down the road from me!

Armed with my camera and a sat nav, Tim and I drove down and found the exact building. I got out of the car and was awash with so many emotions. I stood where she stood, saw what she saw and we recreated the shot.

Britt & Marie

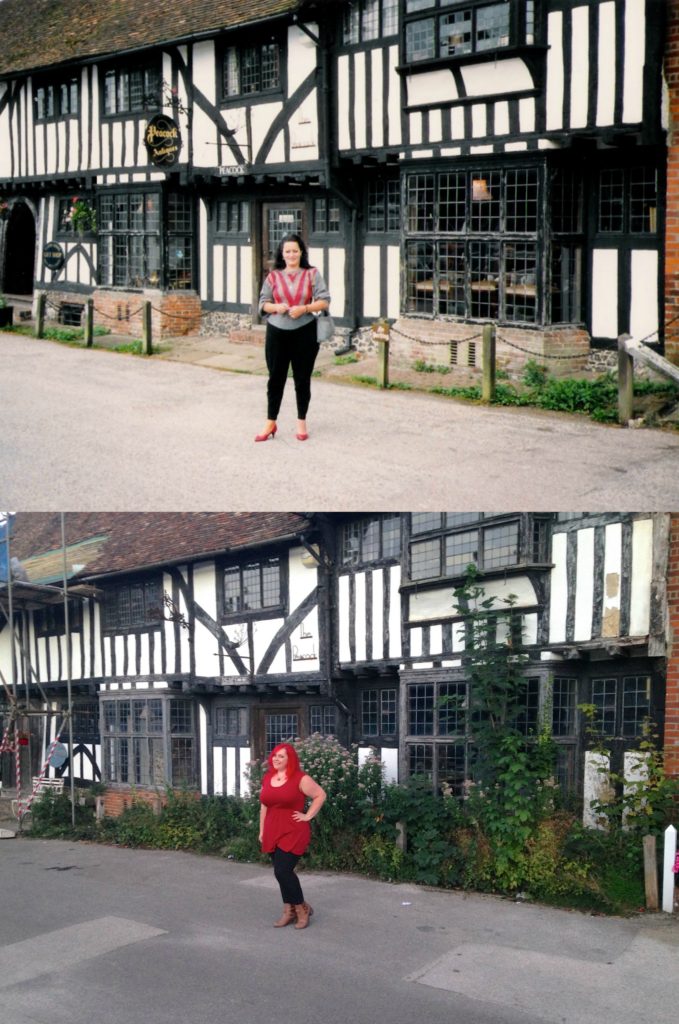
The building looked a little worse for wear, I hear there was a fire. The garden is overgrown and the shop was shut. I have no idea how long had passed between these two photos but it hasn’t really changed that much.


Skip forward to this year, I was looking through photos of a family day to the beach. My mum in a bikini top and shorts, my nan in a summer dress, my grandad in short trousers and a hanky on his head and a 4 year old Britt in a polka dot swimsuit (my love of polka dots started from an early age, clearly!). I was sure this was Leysdown. A beach I have many, many happy memories of visiting in the summer holidays. Tim and I drove down there, picture in hand. I looked around and remember feeling so disappointed. This wasn’t the location. I was at a loss as I didn’t really remember us going anywhere else.

We got ice cream, played mini golf and enjoyed our day out. But I was determined to find this beach.

Turns out, I wasn’t that far off! It was Sheerness beach. On the same island and a short drive away. On our next free weekend we drove down and even though as I stepped out of the car, there wasn’t the familiarity I had in Leysdown, as I held up the picture and saw the surroundings match, tears filled my eyes.

Britt & Marie Sheerness

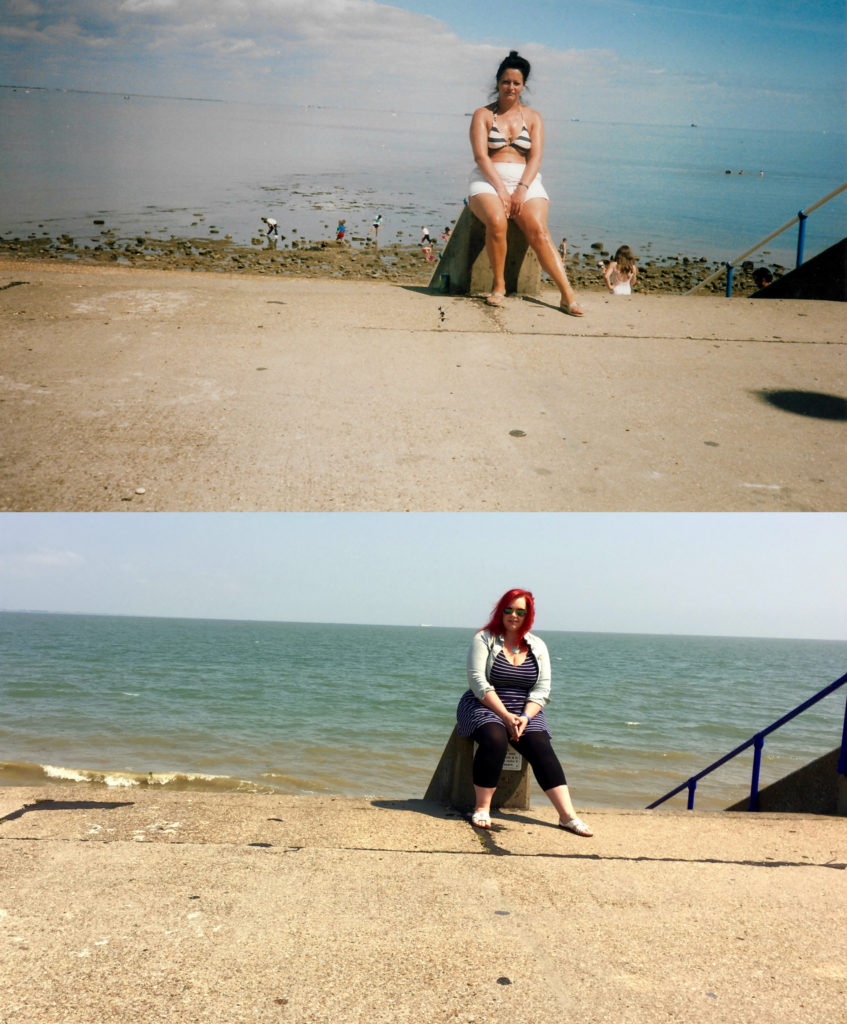
I sat on the plinth where my mum rested in the sun, looking over at my nan who took the picture. Tim sat where my nan did and we got this shot. You can see by my outfit compared to my mum’s the weather must have been slightly different!


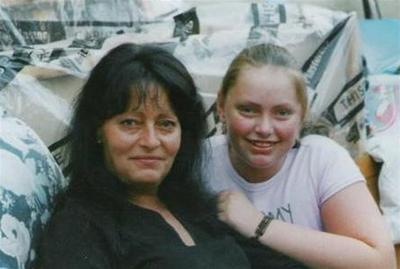
The last photo I have to share with you is one that has been in a frame for 15 years. Wherever I have lived, wherever I have ended up, it has always come with me. It’s a photo of my mum and me that is rather special. It was taken in 2001 on my first and only foreign holiday, to Mallorca, with my mum. I remember getting sunburnt on the first day (some things never change!), my mum looking so beautiful in the sun with her Italian olive skin and long black hair. We had lost my nan earlier that year and she took us away to just be together and celebrate life. It was just a few months later she would be diagnosed with terminal cancer.

The bottom photo was taken this week. Tim and I didn’t book our holiday so close to this location on purpose, it was a happy coincidence. When I saw we would be going there, I simply had to find the location of this photo. I cried when I saw it. I felt so grateful to be there again.

Cuevas Drach Pic

In these three photos, I’m sitting or standing in my mum’s place as she now lives on in me.

My baking and blogging may have helped me out of one of the darkest times of my life, and for that I will always be thankful. Whilst I am aware my depression and mental health was sparked by the passing of my mum, I am also aware my grief is a different matter. It’s a different kind of pain. One that stays with you. One you find ways to learn to cope with.

This is my way.

Everything I do and have in my life I dedicate to my mum. I would not be the strong, confident business woman you see without her. She taught me to go after my dreams, no matter how big they are. She taught me to always believe in myself, even if I didn’t think I could do it, even if I didn’t think I was worth it. She taught me that I can do anything I put my mind to. She instilled so many values, morals and lessons in me that I will be grateful for, for the rest of my life.

I feel so lucky to have had her as my mum, to have been blessed with her presence, her humour, her smile, her laugh. Those memories are so precious to me and now, these recreated photos have a special place in my heart too.

Life is what you bake it.

Britt xo

Poké Ball Cookies

07/16

I used to love Pokémon when I was younger. I was always on my Game Boy trying to catch them. Imagine my surprise when now, as an adult, it’s cool to play with Pokémon again!!

In case you missed it, there’s a new App called Pokémon GO! Not officially released in the UK as I type this, but it has already taken the world by storm! It was released in the US and Australia last week and is already more popular than Instagram and Tinder! It combines the Pokémon universe with our own and tasks the player to go out in search of Pokémon that may be hiding in our house, by monuments, in parks, anywhere!

There was a way to get it in the UK featured on The Guardian website and I caved this morning. I’ve been catching them since! There are articles already to suggest how it can benefit mental health by getting people to go outside in search of Pokémon. I know when my depression was at an all time high, nothing could get me out of the house for love nor money!

I think it’s a great game and this is a fantastic idea and to celebrate I’ve made these Poké Ball Cookies! A tasty, no-spread sugar cookie with a cute Poké Ball sugarpaste design!

Ingredients;

  • 125g cold unsalted butter
  • 125g caster sugar
  • 1 egg
  • 250g plain flour

For the decoration;

  • Red, white and black sugarpaste (ready to roll icing)
  • A large circle cutter
  • Two small circle cutters
  • Pizza cutter
  • Paintbrush & edible glue (or water)
  • Piping gel (or buttercream)

Method;

  1. Cream together the butter and sugar
  2. Add in the egg
  3. Add in the flour and mix until a dough forms
  4. Wrap this dough in cling film and chill for 30 mins
  5. Roll out the dough onto a floured surface
  6. Cut out large circle cookies
  7. Place these on a baking tray and chill again for 15 mins
  8. Bake at 170C for 15-20 mins
  9. Leave to cool completely
  10. Roll out white and red sugarpaste (ready to roll icing) onto a surface dusted with cornflour
  11. Cut out a circle of each the same size as your cookie
  12. Cut both circles in half
  13. On one cookie, stick down half red and half white sugarpaste with either a little piping gel or buttercream
  14. Roll out black sugarpaste and cut a strip
  15. Stick this strip down on the red/white join with edible glue/water
  16. Cut out a small black circle and stick this in the middle
  17. Cut out a smaller white circle and stick this on top
  18. Enjoy!

If you want to turn your baking hobby into a career, check out my book Cakes, Bakes & Business for everything you need to know about running a successful baking business, including pricing, marketing, insurance and much more!

Give it a try and let me know how you get on either on Facebook or Twitter or Instagram.

Happy baking!

Britt xo

Happy Birthday To Me!

06/16

Yesterday was my birthday and yes, I did indeed make my own birthday cake.

I’ve made my own birthday cake since I first started baking back in 2011 and I have loved every one of them! I love seeing how I’ve progressed and am so proud of my baking journey and how far I’ve come!

This years cake was something special. A unicorn inspired, sweet shop filled, 6 layer birthday cake extravaganza! Hope you like it as much as I do!

Unicorn Birthday Cake

Here are a few pictures while I was making it and to answer a few questions;
The cake and buttercream recipes can be found on my classic madeira cake recipe page.
The ‘funfetti’ inside are sprinkles by Scrumptious Sprinkles.
The buttercream was coloured using concentrated Sugarflair colours.
The stripy buttercream outside was made following a tutorial on Iced Jems fantastic page.
The custom topper was made by IcedRainbow.

Happy baking!

Britt xo

Making of the unicorn birthday cake

Raspberry & White Chocolate Cake by She Who Bakes for Stork

06/16

I’ve teamed up with Stork to celebrate the Queen’s 90th Birthday and the Patron’s Lunch to create some fun and delicious recipes for you to bake at home!

This Raspberry & White Chocolate Cake is the perfect showstopper to add to your event table this summer. You can find this recipe here.

Give it a try and let me know how you get on either on Facebook or Twitter and Instagram. Also, come follow @bakewithstork on social media for more wonderful recipe ideas!

Happy baking!

Britt xo


Sign Up to my Newsletter

Subscribe here to my newsletter!

Designed by Clockwork Moggy