How To Make A Car Cake (Mini Cooper)

01/16

Hello bakers,

Here is a step by step tutorial of how to make a Mini Cooper car cake! These basic principles are easily transferrable to any car cake.

image

  1. Bake two 8 x 10 cakes and stack them straight on top of one another. I’ve used a chocolate madeira cake based on the recipe here.
  2. Cut a length off the side to make a better car width.
  3. Round off the corners.
  4. Carve the back of the cake in a slope for the boot.
  5. Carve into the front of the cake and slope down from the top to create the bonnet.
  6. Carve two indents into the bonnet to create the shape of the headlights.
  7. Split your cake into however many layers you would like.
  8. Fill your layers with your desired filling. I’ve used chocolate buttercream (recipe here)
  9. Stack your cakes back onto each other and leave to set. Then cover your cake in a thin layer of buttercream/ganache in a ‘crumb coat’.
  10. Roll out your icing to 5mm thick.
  11. Cover your cake with your rolled out icing smoothing it down with your hands as you go and lifting out any pleats and folds. Use smoothers to get a great finish.
  12. Add on your details with a little edible glue.

image

Step back and admire your awesomeness!

Give it a go and as always let me know how you get on via FacebookTwitter or Instagram.

Happy baking (& decorating!)

Britt xo

If you want to turn your baking hobby into a career, check out my book Cakes, Bakes & Business for everything you need to know about running a successful baking business, including pricing, marketing, insurance and much more!

How To Make A Starburst Decoration For A Cake

01/16

A starburst is a simple way of making an effective decoration for your cakes. It really adds a ‘wow’ factor! Follow my tutorial below to make yours!

  1. You will need thin (24/26 gauge) sugarcraft floristry wires, flower paste, a flower (posy) pick, florist tape and cutters.
  2. Roll out flower paste on a surface dusted with cornflour to the thickness of a 20p.
  3. Cut out your desired shape by pressing down hard into the paste to make sure it’s a clean cut with no frayed edges.
  4. Holding your cut out shape gently between your fingers, twist in the wire until it is just over halfway into your shape. You will be able to feel this.
  5. Leave your wired shapes to dry on foam.
  6. When your shapes are dry, paint them if desired and arrange them all in different heights and sizes.
  7. Holding the ends of the wires between your fingers, cut them to a desired length.
  8. Once cut, use some floristry tape to stick the bottom of them all together.
  9. They should be bandaged up tightly.
  10. Get your flower pick and fill it with a small sausage of flower paste.
  11. Push the taped wires into the flower paste filled flower pick. Leave this on it’s side to dry.
  12. Once dried, push the starburst into your cake, leaving a little bit of the pick on show to take it out easily when cutting the cake.
  13. Spread the wires out so your shapes are evenly spaced.

Please note. Never put wires directly into the cake! As well as being able to drop deeper into your cake, affecting your design, this is also a major health and safety issue. These wires are not ‘food safe’ and can break inside your cake. Make sure you always use a flower pick. These can be bought easily in cake decorating stores, usually right by the wires. I would also strongly advise against you or your customers attempting to eat the wired decorations. As well as them not being ‘food safe’, you may hurt your teeth and even choke on broken wire. Stay safe cake people!

How To Make A Starburst For A Cake

The perfect finish to your cake!

Give it a go and let me know how you get on either on FacebookTwitter or Instagram!

Britt xo

How To Make An Igloo and Penguins Cake – Tutorial

12/15

For a fun and unique Christmas centrepiece,  follow this step by step tutorial to make your own Igloo Cake with adorable penguins!

Equipment

  • 6” hemisphere cake tin or small pyrex bowl.
  • 6″ round thin cake card.
  • 10″ round drum.
  • 1kg white sugarpaste.
  • White modelling paste.
  • Black modelling paste.
  • Orange modelling paste.
  • Blue flowerpaste.
  • Paintbrush.
  • Edible glue.
  • Large rolling pin.
  • Icing spacers.
  • Smoothers.
  • Royal icing.
  • Set of small circle cutters.
  • Quilting tool.
  • Scriber.
  • Scalpel.
  • Small snowflake plunger cutter.
  • Piping gel.
  • Ice blue food colouring.

Equipment can be bought from Iced Jems.

For the cake;

Bake your favourite cake in a hemisphere cake tin or bake a 6” round and carve into a domed shape.

Split and fill your cake with your desired buttercream or ganache and secure your cake to the thin board using buttercream.

Prepare cake by lightly coating with buttercream or ganache.

Before rolling out your sugarpaste, knead until it’s a workable consistency. If the sugarpaste is sticky or your hands are very warm, sprinkle lightly with cornflour. Lightly dust your smooth work surface also to prevent it sticking.

Roll out your sugarpaste to a 1/4 of an inch thickness. If it helps, you can use icing spacers which are perfect for this.

To keep the sugar paste from sticking, lift and move it around as your roll. Add more cornflour if needed.

Gently lift icing over rolling pin to move and lower it onto your cake.

Shape sugar paste to sides of cake using your hands and then your smoothers. I recommend using a smoother because the pressure of your hands may leave impressions on your sugar paste.

Beginning in the middle of the cake top, gently rub the sugar paste onto the cake. Start on one side and by a process of gently lifting any creases out and lifting down onto your cake, you can secure the sugar paste all the way around. If an air bubble appears, use a scriber to gently pop the bubble and smooth the air out.

Use your smoother to mark the sugar paste at the base of the cake and trim the excess using a palette knife or sharp knife.

Fix this to your cake drum with a little royal icing.

Using the pointed end of your quilting tool, mark out the lines around the cake for the ice blocks.

For the tunnel.

Roll a ball of white modelling paste and elongate slightly. Cut both ends off and affix to the front of your igloo with royal icing.

Roll a strip of white modelling paste 1cm thicker than your tunnel and wrap over the top. Stick down with edible glue.
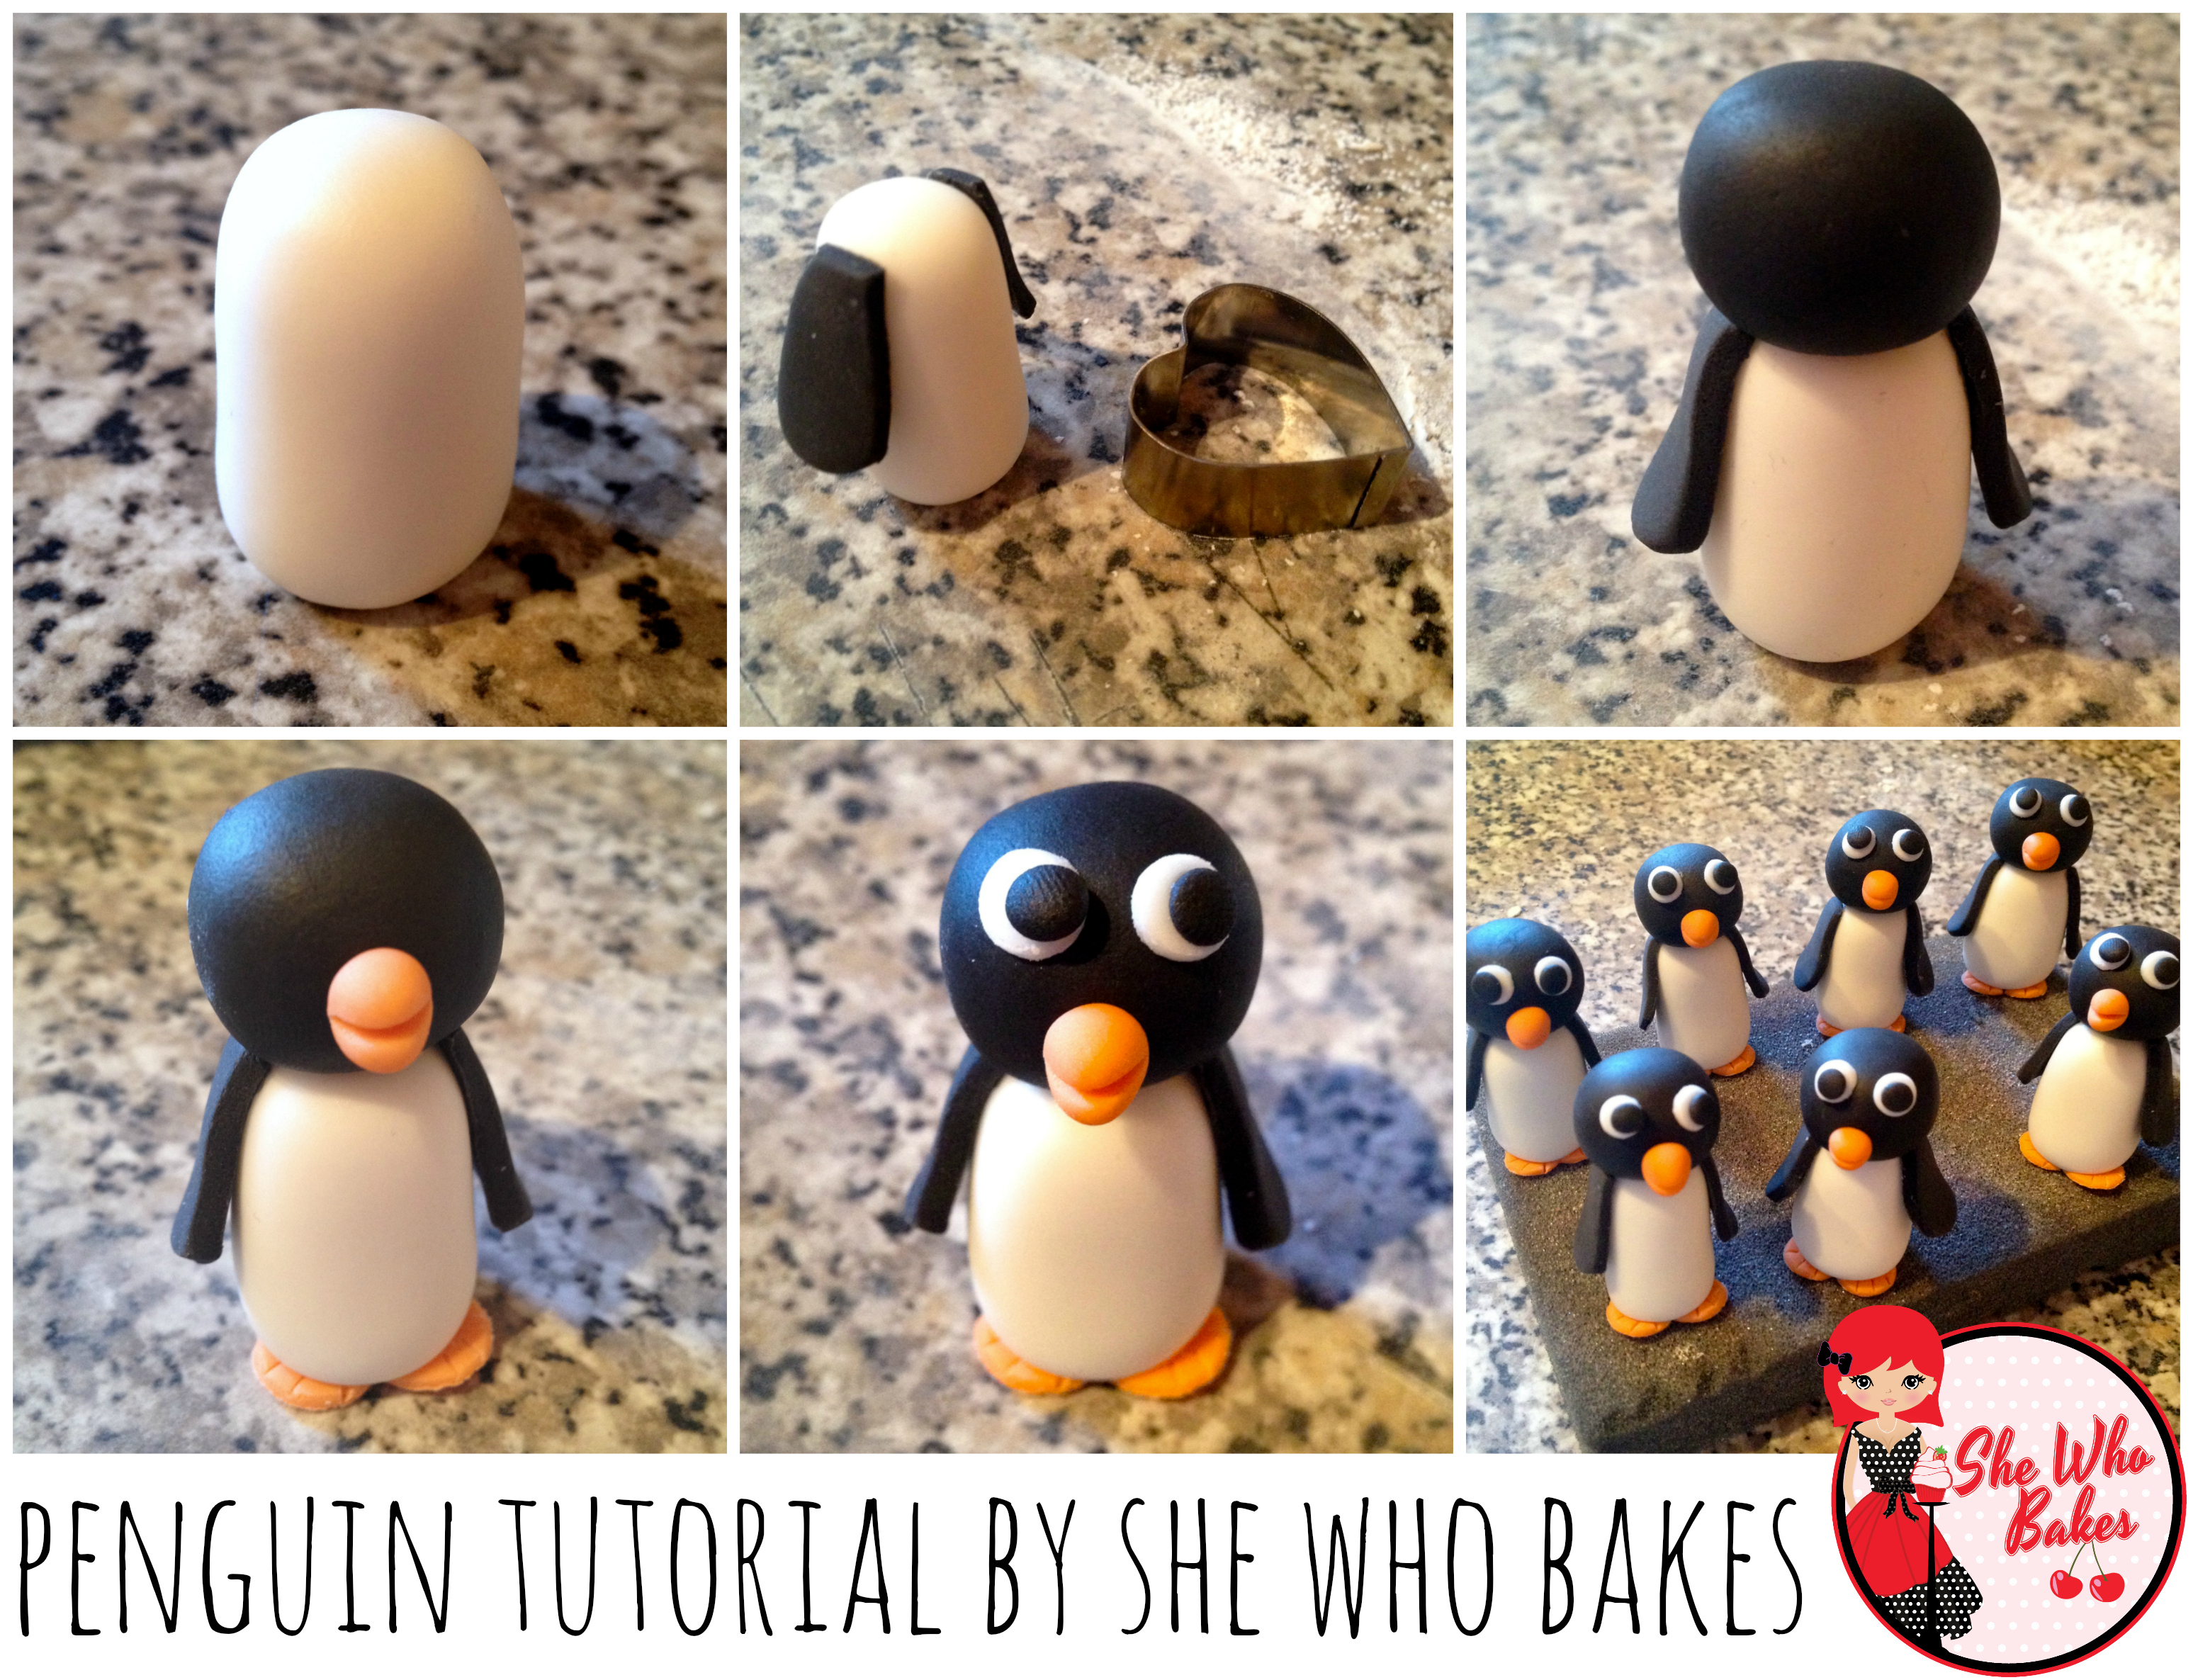
penguin tutorial

For the penguins.

Roll a small ball of white modelling paste and shape into a sausage with flat ends. This will be the body.

Roll out some black modelling paste and cut out a small heart shape. Cut this in half and also cut the pointed end off. Glue these on to the body to create wings.

Roll a small ball of black modelling paste for the head and fix onto the top of the body with edible glue.

Roll a small ball of orange modelling paste and shape into a cone for the beak. Use a scalpel to cut ¾ of the way into the cone to open up the beak. Fix on with edible glue.

Roll out your orange modelling paste and cut out a small circle, cut the circle in half using your scalpel, these will be the feet. Mark out three lines on each for toes. Glue these to the bottom of your penguin.

For the eyes, roll out white modelling paste and cut out small circles, do the same with the black modelling paste but use smaller circles. Glue these on to the head of your penguin.

Leave the penguins to harden.

For the drum.

Spread a thick layer of royal icing over your cake drum, making sure it goes up to your igloo and tunnel. Then, using a pallet knife, stipple the royal icing to make it look like snow.

Whilst the royal icing is still wet, stick your penguins down. Use a little royal icing to stick a penguin to the top of the igloo.

For the pond.

When your royal iced board has dried, colour some piping gel with ice blue food colouring. Spoon some of this onto your royal iced board to create your ice pond.

For the snowflakes.

Roll out blue flowerpaste very thinly on a dusted surface. Cut out snowflakes using a small plunger cutters. Leave these to dry. Once dried, stick to the igloo using a little royal icing.

If you want to turn your baking hobby into a career, check out my book Cakes, Bakes & Business for everything you need to know about running a successful baking business, including pricing, marketing, insurance and much more!

Give it a try and let me know how you get on either on Facebook or Twitter or Instagram.

Merry Christmas and happy baking!

Britt xo

After Eight Mint Chocolate Bark

12/15

Mint chocolate is perfect this time of year. This tasty treat is super quick to make and great to bring along to your festive family gatherings!

Ingredients;

  • 300g dark chocolate
  • 300g white chocolate
  • 50g green candy melts (or you can use green powder food colouring)
  • a box of After Eight chocolates
  • Peppermint flavouring (It’s best to use peppermint oil but if you can’t get hold of any, a drop of oil in with your mint extract will stop the chocolate from seizing.)
  • Green sprinkles (optional)

Method;

  1. Line a shallow tin with greaseproof paper. I’ve used a 14″ x 10″.
  2. Melt dark chocolate, add a teaspoon of flavouring and pour into your lined tin.
  3. Spread the chocolate around so it’s a nice, thin layer.
  4. Pop this in the freezer for 10 minutes.
  5. While your chocolate is chilling, chop up some After Eight chocolates.
  6. Melt white chocolate and green melts together then add a teaspoon of flavouring.
  7. Pour this over the frozen dark chocolate and spread nicely.
  8. Decorate  with chopped pieces of After Eight and sprinkles.
  9. Pop in the fridge for a few hours then cut up and serve!

Things to remember;

Wait until your dark chocolate has set before pouring over your white and green.

If using an alcohol based peppermint flavouring/extract, make sure to ass a teaspoon of oil into your melted chocolate to stop it seizing.

Candy melts can be purchased from Iced Jems.

If you aren’t using candy melts to colour your white chocolate, use a powder based food colour, again to stop the chocolate seizing.

These will last weeks in the fridge so you can make them well in advance of your event.

If you want to turn your baking hobby into a career, check out my book Cakes, Bakes & Business for everything you need to know about running a successful baking business, including pricing, marketing, insurance and much more!

Give it a try and let me know how you get on either on Facebook or Twitter or Instagram.

Happy baking!

Britt xo

All of my online cake decorating courses are currently HALF PRICE! Grab a bargain here

Bakery Charms

11/15

If you haven’t yet heard of Bakery Charms, prepare your bank account, you’re going to spend a lot of money.

Bakery Charms is an independent, online jewellery store based in Hawaii and run by Jenn K. Lee who is a true artist! Jenn offers realistically cute dessert necklaces, earrings, bracelets, rings, and more. Designed with fun and happiness in mind, every piece is made to order and meticulously crafted by hand out of polymer clay and other materials.

10313385_253850664820151_2033529289422099257_n

Since opening for business in March 2014, Bakery Charms has shipped thousands of clay confections to be worn and treasured by customers throughout the US and the rest of the world, including the UK, South Africa, Singapore, Denmark, Japan, Australia, and Germany.

Jean’s designs have been featured in many magazines, newspapers, blogs and articles and recently featured on O, The Oprah Magazine’s official Instagram.

I fell in love with Jenn’s designs after seeing them on Instagram. Her account currently has over 31,000 followers and it’s easy to see why. From cakes, cupcakes, cookies and pancakes to mini bowls of mac and cheese, sandwiches and pizza slices, her range is amazing. Each piece is lovingly handmade and Jenn sculpts each product out of polymer clay using various tools and her hands.

Needless to say, I had to get involved. I spoke to Jenn about a personalised necklace and we spoke about doughnuts! (Because, who doesn’t love doughnuts!) Five to be precise, spelling my name. Add the She Who Bakes colours of red, pink and white, sprinkles and icing drizzle and voila. Perfection!

Jenn sent me over some progress shots and I was fascinated to see how my beautiful necklace came from one piece of clay! It’s truly amazing.

12190120_417834348421781_7652425312564679817_n

I received it yesterday and have been obsessed with it. It’s so small and delicate and amazing! It’s only 1 1/4″ long and the detail is incredible. Make sure to go check out Jenn and Bakery Charms.

Happy baking,

Britt xo

Business Women in Action Conference 2015

11/15

I’m really looking forward to speaking at Business Women in Action National Conference tomorrow in London.
Learn, connect, enjoy and celebrate! Be inspired by the amazing speakers’ stories, learn from essential workshops designed for your business growth, see the products and literature available in the exhibition and meet with like-minded business women.

Hope to see you there!

Britt xo

Washi Tape for Cake Decorating

10/15

If crafting is your thing, or you use Pinterest, chances are high you will have seen washi tape. These cute rolls of tape are everywhere. From craft stores to gift shops to my local post office, they have taken over. One awesome thing about these is that they come in adorable colours, patterns and designs. Needless to say, I’ve become slightly obsessed.

What is Washi Tape?

Well, according to omiyage.ca:

In Japan, it’s known as masking tape (マスキングテープ) and the most renowned brand of washi tape is simply called mt – which stands for “masking tape”. The term “washi tape” refers to the fact that the tapes are made from Japanese rice paper and differentiates it from typical masking tape you might find in the hardware store.

Washi Tape for Cake Decorating

Some of you may know, I have a passion for covered cake boards (I recently wrote an article about the subject here) and I believe covering the sides of a cake board is just as important as covering the top. Until now, I have used thin double sided tape and 15mm ribbon to decorate my bakes, that is until I had a conversation with my friend Jemma from Iced Jems.

Jemma told me that instead of using double sided tape and ribbon, she had been using washi tape. Now, I knew about it as a craft item and had used it in gift wrapping before now but I had never thought to use it in cake decorating. At 15mm thick, it’s the perfect size to cover your 12mm cake drum (& 3mm icing!)

I immediately bought ten rolls. All different colours and designs. My imagination was running wild. Now, it is what I use to cover my cake boards in my classes, stage demonstrations and presentations.

It’s so easy to use and with a sticky back, no need for double sided tape. This stuff is great for an easy to use and effective finish to your design. You can buy lots of different Washi Tape designs from Iced Jems. I’d love to see what you create!

Let me know how you get on, either on Facebook or Twitter. (Oh! I’m on Instagram too!)

Happy baking & creating!

Britt. xo

Depressed Cake Shop

10/15

Next month I will be flying out to Los Angeles for an evening of stories and cake with the Depressed Cake Shop and This Is My Brave, Inc. to celebrate the launch of the critically important anthology Shades of blue. I will be baking for the event with all money going to continue to spread the word that mental health matters!  American friends, save the date: November 19th, 8pm at Harmony Gold Theatre on Sunset Boulevard. Come for the stories, stay for the cake! All info can be found here.

I am honoured to say I have been working with the Depressed Cake Shop since January 2013 and the hard work that each and every person puts into it both astounds and amazes me. Valerie, whom I am seeing in Los Angeles, is nothing short of amazing. This lady works tirelessly non-stop and has made the cause her mission and I am proud to be working alongside her.

I wanted to share my DCS journey with you all. Back in January 2013, I saw this tweet;

I hadn’t been baking long and it was only two years after my Pudsey cake, but I really wanted to help. I was on very strong anti-depressants and even tried to end my life. Baking was the only thing that made me happy so to combine the two to raise money for mental health charities was something I was desperate to get involved in.

I tweeted back saying I wanted to make a cake for the cause. The following day I donned my apron, kneaded some black and grey icing and created a torn and cracked cake that was rainbow sponge inside. I took a scribe and carved the words “I’m Fine” on the top. How many times had I said that and not meant it?

This cake was exactly how I felt on a bad day. Cracked, torn, broken and unable to tell anyone how I really felt. Making this cake gave me the confidence to talk about my own mental health.

I sent in my picture and was amazed to see it had been used as part of the campaign and a few months later was on the Daily Mail website –

What is the origin of the Depressed Cake Shop?

In the summer of 2012 Emma Thomas, a creative director and p.r. specialist in the United Kingdom, conceived a project called the Depressed Cake Shop. One in four people will suffer from mental health issues at some point in their lives. The Depressed Cake Shop was created as a unique (and delicious) platform to raise awareness and discuss these issues while raising money for local mental health charities.

Emma’s brief was very specific — the cakes had to be grey, but could have a pop of color to symbolise hope. Her astute intuition was that this would ensure that the concept stood out from the countless charity fundraisers that take place each year.

It was very successful and garnered attention throughout the United Kingdom. It also created an active community of bakers and organizers who joined a Facebook group and were inspired to create pop-ups of their own.

Then, something magical happened. The concept did not end with that first pop-up, the bakers and organizers kept going. Shops popped up in San Francisco, Los Angeles, Glasgow, Houston, Seattle, Kuala Lumpur, Atlanta, Australia and India (just to name a few).

Many of the cakes were designed and donated by bakers who had personal experience with depression, and they used their creations to express their struggles with and experiences of their illnesses. Others were compelled to join because they had seen friends and family members suffering and wanted to be part of a solution. The committed co-conspirators who have kept the Depressed Cake Shop movement alive are continually looking for new opportunities to change the conversation around mental health one grey cake at a time.

Woman's Own

Last year, I was interviewed by Woman’s Own magazine (as above) and I told my story about depression, baking and how the Depressed Cake Shop came at such a perfect time. If I hadn’t picked up a mixing bowl and a wooden spoon, I doubt I would be here today writing these words. I am now 18 months clear of any and all anti-depressants and life couldn’t be better. To read more about my story and why I started baking in the first place, click here.

I am very proud to be part of this and I hope to continue to raise awareness of mental health issues. Every person I have met on this journey, everyone who has shared their story is a complete star and I am so grateful to know you all. I am in debt to all at the Depressed Cake Shop. I am amazed and thrilled just how far the concept has gone!

In honour of me going stateside to meet the DCS US family, I have created a Depressed Cake Shop Fudge recipe. With it’s trademark grey exterior and a pop of colour inside, these easy treats are perfect for your pop-up! You can find the recipe here.

I’d love to connect with you all, either on FacebookTwitter and Instagram.

Happy baking!

Britt. xo


Sign Up to my Newsletter

Subscribe here to my newsletter!

Designed by Clockwork Moggy
503 Service Unavailable

Service Unavailable

The server is temporarily unable to service your request due to maintenance downtime or capacity problems. Please try again later.

Additionally, a 503 Service Unavailable error was encountered while trying to use an ErrorDocument to handle the request.