Mickey Rice Krispie Marshmallow Treat Pops

06/20

I love all things Disney and all food Mickey shaped! Being in Disneyland truly is my happy place. Sadly, much like everyone else my 2020 trips have been cancelled but I wanted to bring some Disney magic to my kitchen.

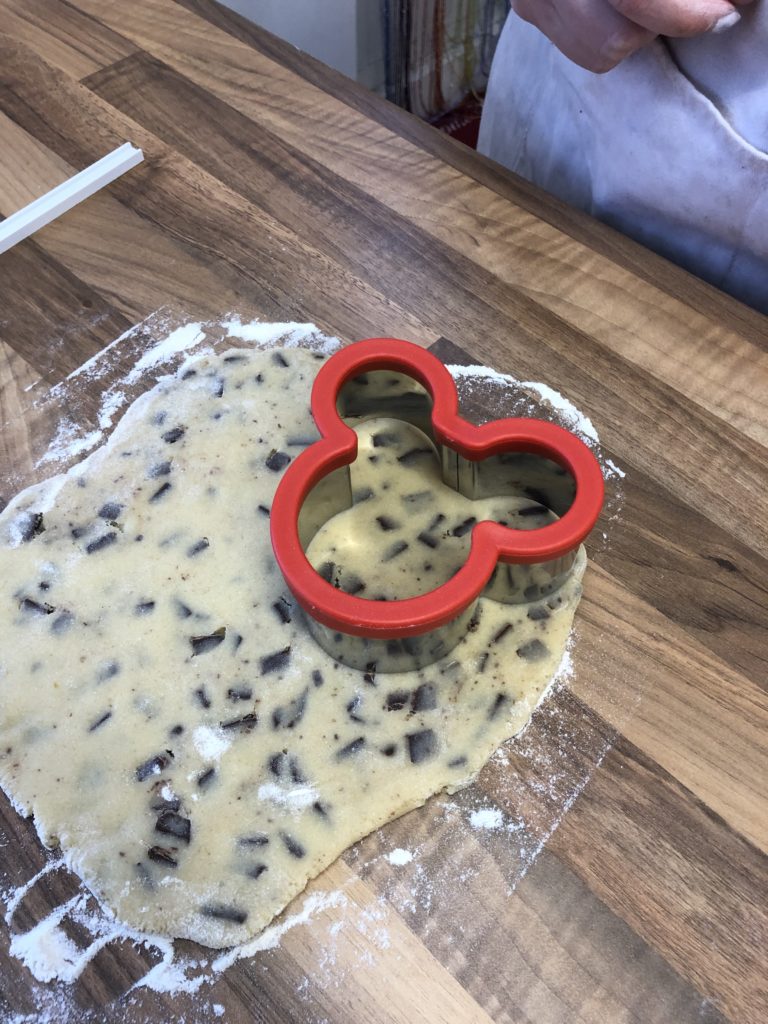
This recipe continues my Mickey Treat series, previous park inspired instalments include my Chocolate Chip Mickey Cookies and my Mickey & Minnie Decorated Cookies.

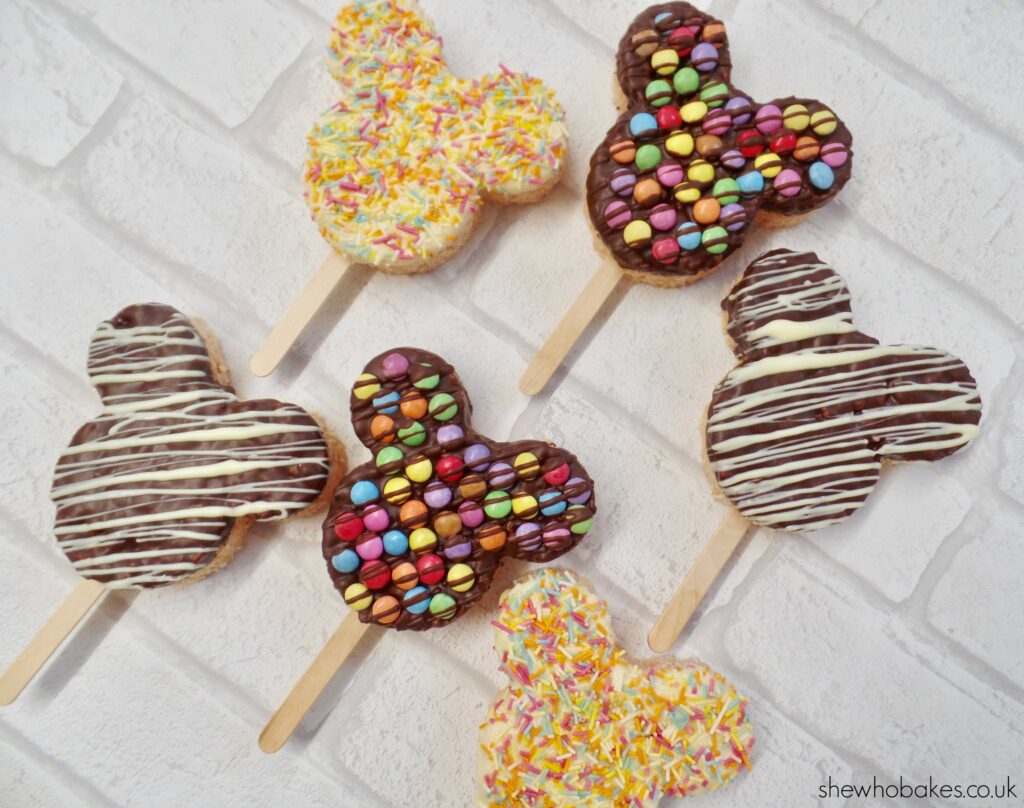
Today’s treat is a sticky and sweet, classic Disneyland delight – Mickey shaped Marshmallow Rice Krispie Treat Pops!

Made using soft marshmallows, Rice Krispies and a couple of personal additions and decorated with melted chocolate. I originally saw these pop designs on Pinterest, inspired by the actual treats in the Disneyland parks and tracked them down to What Charlotte Baked.

You can, of course, just use the classic combination of butter, Rice Krispies and marshmallows but by adding in the vanilla and salt, I think it takes this tasty treat to a whole new level!

For the treats you will need – 

  • 50g unsalted butter
  • 250g marshmallows
  • 200g Rice Krispies
  • ¼ tsp salt
  • 1 tsp vanilla

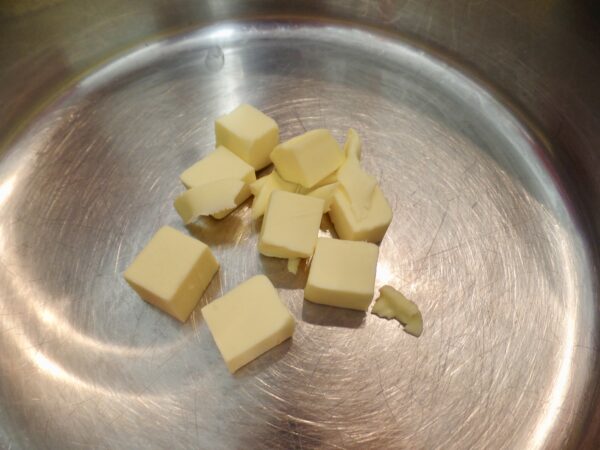
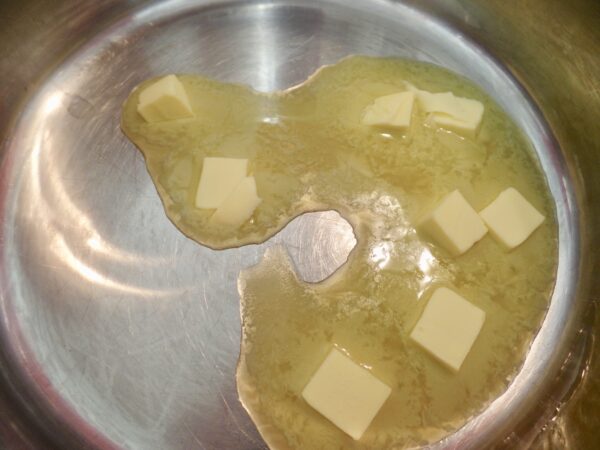
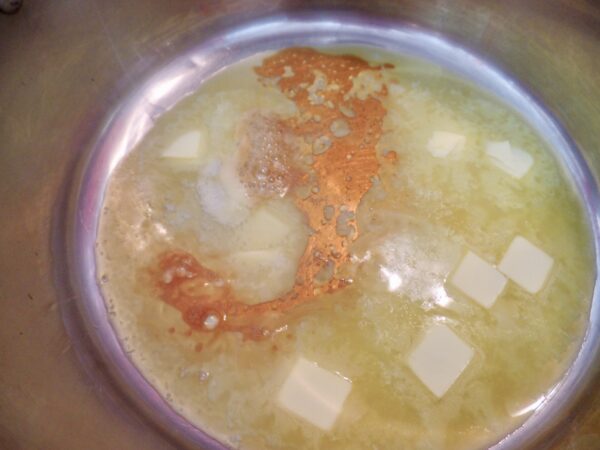
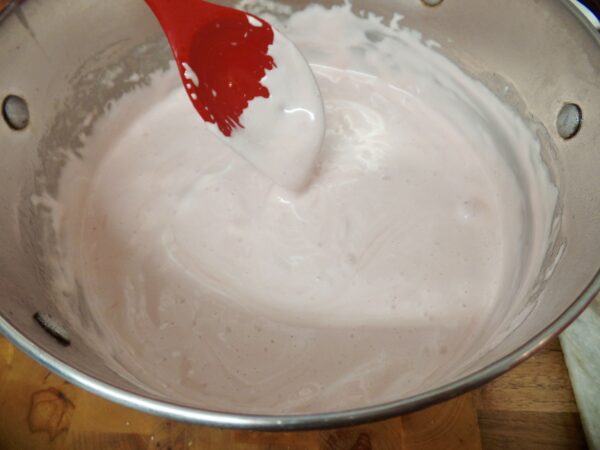
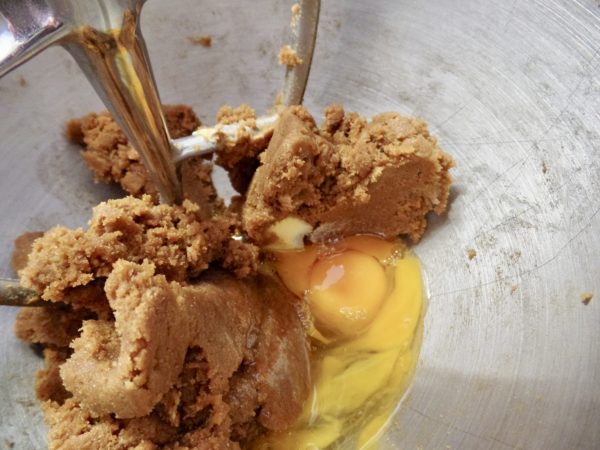
Cube your butter and heat in a large pan. Once the butter starts to melt, add in your vanilla and salt and mix well.

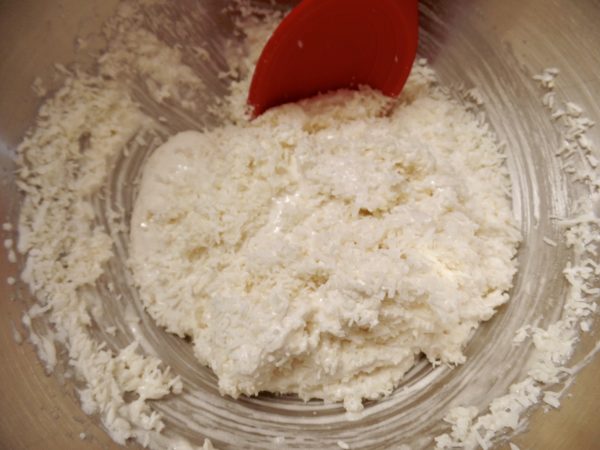
Then, add in the marshmallows and mix until completely melted. Once melted, take the pan off of the heat.

Mix in your Rice Krispies until completely coated. Then, pour into a lined tray. I’m using an 8″ x 8″. I’ve also used more greaseproof paper than I need and left it outside of the tin so I can lift the treat slab out easier.

Gently push down to flatten the top. I’ve found the best way to do this is to wipe a little oil onto the back of a rubber spatula and use this to press down with.

Leave to set completely.

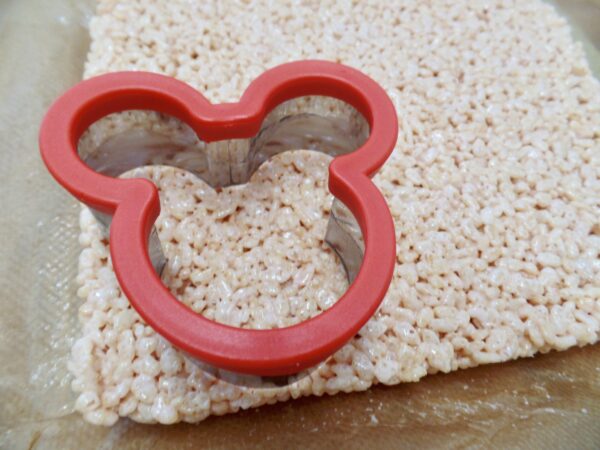
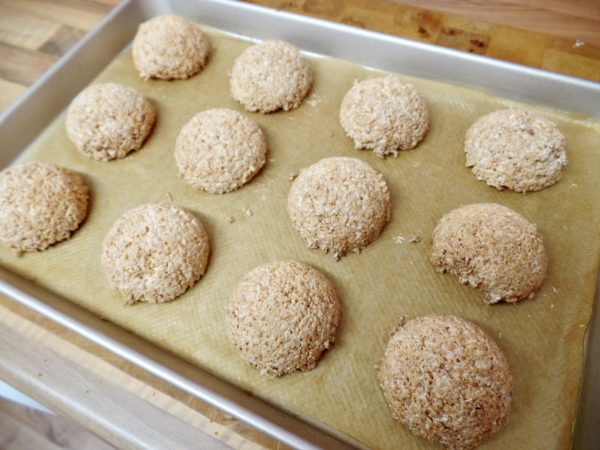
Once set, lift the slab out of the tin. You can then either cut into squares using a sharp knife or, if you want the Disney touch, cut out shapes using a Mickey cutter (you can find the cutter I used here).

A little tip, wipe a little oil around the metal of the cutter before pressing down. This made it much easier.

Then push your shapes out onto a wire rack. My slab made 6 Mickey shapes with a bit leftover to nibble on!

To decorate you will need – 
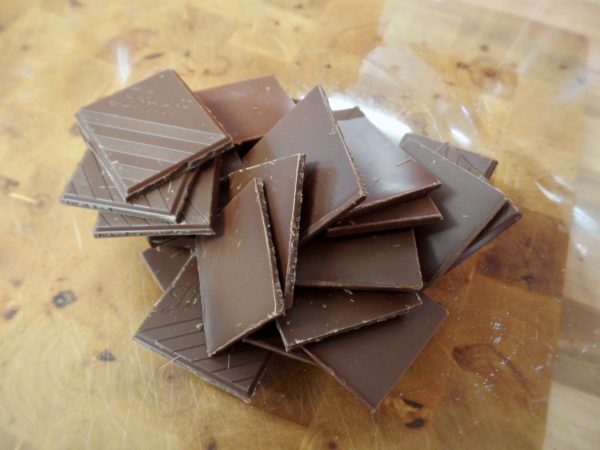
  • 150g milk chocolate
  • 150g white chocolate
  • Sprinkles
  • Mini Smarties
  • Flat lolly pop sticks
  • 2 teaspoons coconut (or unflavoured) oil

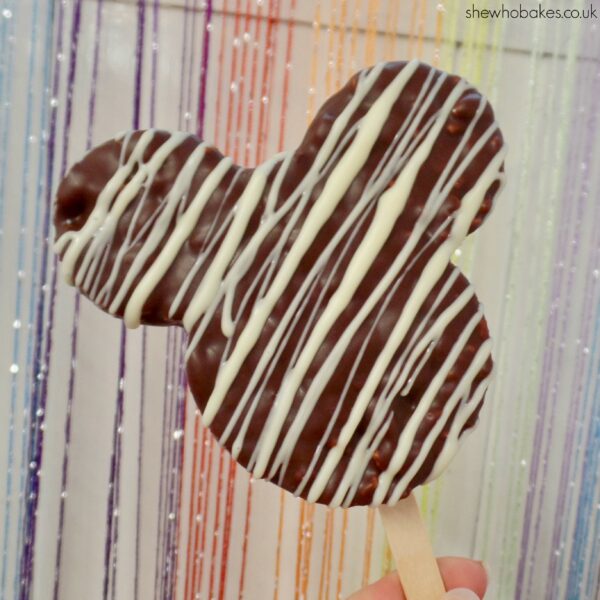
For the decorations, I’m going with three designs; milk chocolate with white chocolate drizzle, white chocolate with sprinkles and milk chocolate with mini Smarties. You can either leave them plain or do something completely different!

If you’re going with one of the designs I’ve used, break 150g milk and white chocolate into squares in separate bowls and microwave on short bursts until melted. I like to add a teaspoon of coconut oil into the melted chocolate to make a better consistency (and it tastes nice!) but if you don’t like coconut, use any unflavoured oil instead.

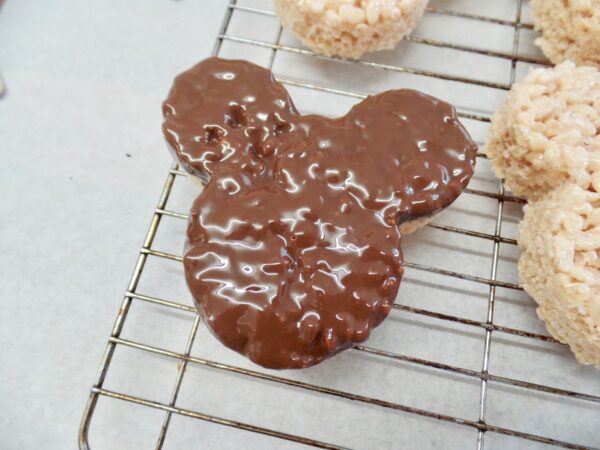
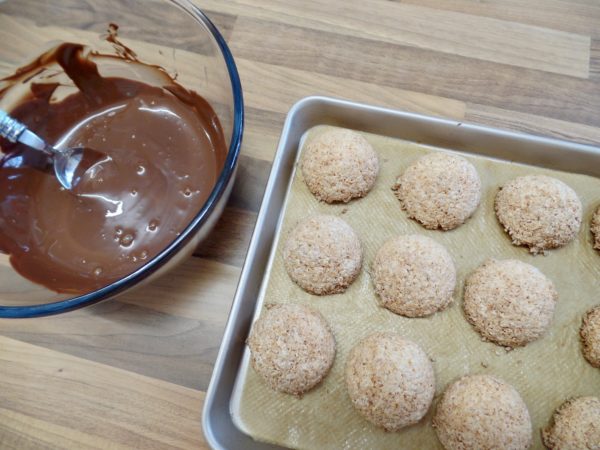
Carefully dip the Mickey Rice Krispie into the chocolate face first. Lift it slowly and let the excess chocolate drop back into the bowl. Then place it on a wire rack with a sheet of greaseproof paper underneath.

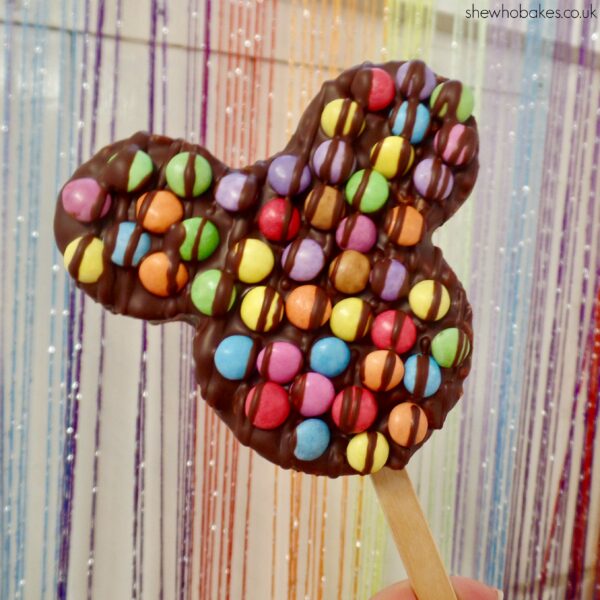
I dipped four in milk chocolate. Two of these I covered in mini Smarties and then drizzled in more milk chocolate. Two more I left to set and then drizzled in white chocolate. The last two I dipped in white chocolate and then covered in sprinkles.

Leave these to set completely.

Once they are all set, spread a little oil onto the end of your lollypop stick and gently push into the bottom of your Mickey treat (you can find the sticks I used here).

You need to keep these treats in an airtight container. They will last 2-3 days. They do not need to be refrigerated as this may make them too firm to enjoy.

These treats are best enjoyed snuggled up on the sofa, watching a Disney classic.

If you fancy a more classic Rice Krispie Treat, check out my bars here.

Give it a go and let me know how you get on, either on Facebook or Twitter or Instagram.

Happy baking!

Britt xo

For more information on how to decorate your cake and go from home bake to showstopper, check out my list of latest online cake decorating courses here.

If you want to turn your baking hobby into a career, check out my book Cakes, Bakes & Business for everything you need to know about running a successful baking business, including pricing, marketing, insurance and much more!

Scones with Jam & Cream

05/20

Classic scones with strawberry jam and clotted cream are a favourite of mine. Although, while I make cheese scones very regularly, classic scones are more something I tend to have out at an afternoon tea. However with lockdown 2020 still going strong and my desire to have an afternoon tea growing as well, I decided to bake some to enjoy this bank holiday weekend.

I love creating new recipes but I am a firm believer of ‘if it ain’t broke, don’t fix it’ and this is why I tend to use the scone recipe on the BBC Good Food Website which can be found here. But I have made a few observations and changes to the recipe.

As I can’t have raw or semi-raw egg, I omit this entirely and instead brush the top of the scones with milk before baking. I also tend to use a very small amount of lemon juice as too much really makes the milk go funny.

As well as this, I find the baking time is a little off and it needed double that time in my oven. Remember, all ovens are different and yours might behave differently to mine so I advise to bake them for the allotted time and then check on them regularly and adjust accordingly.


These scones are best fresh on the day they are made. They can also be frozen for a later day.

Give it a go and as always, let me know how you get on, either on FacebookTwitter or Instagram.

Happy baking,

Britt xo


Chocolate Chip Mickey Cookies

03/20

A chocolate chip, chocolate drizzled Mickey cookie is one of my favourite treats to enjoy on Main Street in Disneyland Paris. Sadly, my March 2020 trip has been cancelled but I still wanted to enjoy a little bit of Disney magic. So I recreated this delicious cookie.

For this recipe, I’ve used my no spread cookie dough which really helps the biscuit keep it’s distinctive shape.

I followed the steps exactly up until step 5, where by I mixed in 80g chopped chocolate (you can also use chocolate chips but we didn’t have any in!). The rest of the steps are then the same. Turn the dough out onto a surface dusted with flour, wrap well in cling film for 30 minutes and then, once chilled, roll out the dough and cut into your desired shapes. As I was replicating the Mickey cookie design, I used a Mickey cookie cutter. You can find the cutter I used here.

I then chilled the cut out shapes on the baking tay for 30 minutes. Then baked at 180C (fan assisted) for 12-15 minutes or until the edges start to brown.

Once cooled, I melted 150g chocolate and mixed in 1 tablespoon coconut oil. This made the chocolate a love consistency for dipping. I then dipped the top of the cookie (the ears) into the chocolate and laid on a cooling rack over a sheet of greaseproof paper. I then used a tablespoon to drizzle chocolate onto the rest of the cookie. Thus replicating the design!

Once the chocolate is set, these cookies are ready to eat! Stored in an airtight container, they will last for 2 weeks.

If you’d like to see another Disneyland Paris inspired bake, check out my blog post for decorated Mickey & Minnie Cookies here.

Give it a go and let me know how you get on, either on Facebook or Twitter or Instagram.

Happy baking!

Britt xo

For more information on how to decorate your cake and go from home bake to showstopper, check out my list of latest online cake decorating courses here.

If you want to turn your baking hobby into a career, check out my book Cakes, Bakes & Business for everything you need to know about running a successful baking business, including pricing, marketing, insurance and much more!

Unicorn Squares

02/20

If you’re looking for a quick and easy sweet treat these Unicorn Cake Squares are so simple, easily customisable and delicious!

These were made using my vanilla cupcake recipe, but instead of splitting into cupcake cases, I have poured the whole mix into a lined 10 x 8 baking tray and baked for the same time; 45 minutes at 140C fan assisted.

Once baked I left to cool in the tin, then turned out and carefully turned over.

I decorated with vanilla buttercream (recipe here) that I split and coloured with Sugarflair Aqua, Sugarflair Grape Violet and Sugarflair Pink and then mixed together. Be careful not to mix it too much otherwise it will turn completely purple without a hint of other colours. Just a quick mix is all you need to do.

Spread the buttercream over the cake, top with sprinkles, cut into slices and enjoy!

If vanilla Unicorns aren’t your thing, these cake squares are so customisable too. If you wanted them a different flavour, just omit the vanilla from the sponge and buttercream and add anything else you like. Here are some ideas based on different versions I’ve baked before –

  • Strawberry Delight. 100g freeze-dried strawberry pieces and 1tsp strawberry flavouring added to the mix before baking. 1tsp strawberry flavouring added to the buttercream. Topped with more freeze dried strawberry pieces and strawberry dessert sauce.
  • Caramel & Chocolate. 50g tinned caramel and 50g milk chocolate chips added to the mix before baking. 1 tablespoon tinned caramel added to the buttercream. Topped with caramel pieces and milk chocolate chips.
  • Bailey’s & Coffee. 2 teaspoons of instant coffee mixed with 50ml hot water added to the mix before baking. 2 tablespoons Bailey’s added to the buttercream. Topped with white chocolate shavings and drizzled with melted milk chocolate.

As you can see, the only limit is your imagination! Have fun with it, baking is all about experimenting!

Happy baking,

Britt xo

Egg Free Vegan Meringues

01/20

If you follow my Twitter or Instagram you may know that a few years ago in 2015, I developed a rather severe egg allergy. It happened almost overnight and one day I could eat eggs fine, and the next I was in hospital in agony. The rather bizarre thing was, eggs baked into cakes and cookies etc, I would be absolutely fine with. But scrambled, poached, omelettes and even quiche was out of the question. I would be rolling around in agony and I wasn’t up for that to be honest so I completely cut eggs out of my diet (with the exception of cakes, luckily!). I found a bit of information about this kind of allergy here if you’re interested.

Since then I’ve been researching for egg substitutes in goodies that have made me unwell, meringues being one of them.

I saw online that you could actually make meringue from aquafaba, which is the water from a can of chick peas! I was ultimately rather skeptical, but having watched a few videos and read a few blogs, such as this one from Sainsbury’s, I wanted to give it a go myself to see if I could enjoy meringue again!

It had been on my list of things to make but as of late I had been taking a little bit of a baking break, then this afternoon I had made this gorgeous Spanish Chickpea and Spinach Stew by Lazy Cat Kitchen and just as I was about to drain the precious aquafaba down the sink, I remembered; MERINGUE!

It’s ultimately exactly the same process as normal meringue. Whisk up the ‘egg’, in this case aquafaba, add in flavouring and dry ingredients, pop on a baking tray and leave in the oven for 7 days. Ok, only a few hours but it feels a lot longer when you wanna see what it turns out like!

There are lots of different variations on this recipe but I went with a basic meringue of –

  • 1 x 400g can chick peas, drained. (For the actual chick peas, I highly recommend the stew recipe I’ve linked above! It was delicious).
  • 120g Icing Sugar
  • 1 tsp vanilla

I’ve seen other recipes with cream of tartar in it, which I should have probably used but I didn’t have any in the cupboard.

Whisk up the aquafaba on a high speed until it goes white, fluffy and has ‘soft peaks’. NOTE: This took longer than it usually does with normal egg whites so persevere and keep at it.

Add in the vanilla and icing sugar one tablespoon at a time.

There are so many options when it comes to meringue designs. You can pipe it into an attractive shape, blob it on using a spoon, make kisses using a star nozzle, the choice is up to you. Whatever you decide, put your meringue onto a baking tray lined with greaseproof paper.

I went with a mixture of kisses and swirls, because why not. I also wanted to add a bit of colour to mine as I love all things bright and colourful.

I fitted a disposable piping bag with a closed star 1J nozzle and painted Sugarflair concentrated food colouring up the sides of the piping bag. For this I used Deep Purple, Aqua Blue and Baby Pink. For more detailed photos on this aspect, check out my other blog post here about dyed buttercream. They piped the same as normal meringue. So far, so good.

I also used a piping bag holder from Iced Jems which has been a life saver. Do you know how many times I’ve dropped a piping bag while trying to fill it one handed? Lots. Lots of times.


I then piped my swirls and stars onto a greaseproof paper lined tray and baked at 90ºC fan assisted for 2 hours, then turned the oven off and left them in there until the oven had gone cold. I actually turned the oven off and went out for the evening so I couldn’t tell you exactly how long they were left in there but I would personally leave them in for a further hour at least once your oven is off.


The fab thing is, they taste (to me anyway) like ordinary meringues! I’ve not had them in a while now but they certainly taste how I would expect them to! Finally meringue is back on the menu for me and I’m rather happy about it!

Make sure to keep them in an airtight container to stop them going soft. They should last 3-4 days.

Give it a try and let me know how you get on either on FacebookTwitter or Instagram.

Happy Baking!

Britt xo

If you want to turn your baking hobby into a career, check out my book Cakes, Bakes & Business for everything you need to know about running a successful baking business, including pricing, marketing, insurance and much more!


Coconut Macaroons

11/19

{AD}

This week, I’ve partnered with Happy Eggs to try out their liquid egg whites! It can be such a pain to separate eggs without making a mess. I for one always get shell mixed up in there by accident, and once you have separated them to get your whites, you need to either make something with the yolks or they end up being wasted. Having the convenience of the egg whites already separated and ready to go seemed like a great idea and one I wanted to try out!

You may or may not know but I actually have a raw and semi-raw egg intolerance so sadly I couldn’t test out a delicious omelette or crunchy meringue BUT something I can have, and something I luckily find super tasty are Coconut Macaroons. These beauties use only the egg white and are baked enough for me to enjoy them so I thought what better way to test them out than with a batch of these delicious morsels.

The pack informed me that one tablespoon was the equivalent to one egg white so weighing them out was a breeze! The egg whites themselves have so many health benefits including being fat and cholesterol free, low carb, low calorie and high in protein! I mean, we’re going to be adding sugar and chocolate and some other less than healthy ingredients to these but it’s great to know it’s got a healthy base!

So, let’s get baking!

Ingredients –

  • 4 egg whites
  • 150g caster sugar
  • 300g desiccated coconut
  • 1 tsp vanilla

To decorate (optional) –

  • 250g melted milk chocolate

Method –

  1. Whisk the egg whites, caster sugar and vanilla until the mixture has gone white and doubled in size.
  2. Carefully fold in the desiccated coconut.
  3. Spoon the mixture into balls (I used an ice cream scoop) and place on a lined baking tray.
  4. Bake at 170C (fan assisted) for 20-25 minutes or until they are golden brown.
  5. Once cooled, dip the bottom in melted chocolate and drizzle with more chocolate! (optional).

That’s it! They are so simple to make and with the added benefit and convenience of the pre-separated liquid egg whites from Happy Eggs, you can go from wanting something sweet to eating a delicious coconut macaroon in little under an hour start to finish!

For more information on Happy Eggs and their products check out their website here.

Give them a go and let me know how you get on!

Happy baking!

Britt xo

This is a paid partnership with The Happy Egg Co. All views and opinions are my own.


Competition Details

For you chance to win a special baking kit, an egg recipes cookbook and Happy Egg Co liquid egg white products for you to make whatever you like with, head over to my Instagram to like my page and the Happy Egg Co page and answer the competition question! http://instagram.com/brittmariebox

And now for the terms & conditions:

– The competition starts at 6pm on 26th November 2019

– The competition closes at 9pm on 28th November 2019

– The competition is only open to UK mainland entrants.

– The winners can not transfer the prizes and there is no cash alternative.

– The competition is in no way sponsored, endorsed or administered by, or associated with Facebook or Instagram.

– The winners will be chosen at random and the decision is final.

– The winners will be notified within the week after the competition ends.

– The prizes must be claimed within a month after the winners’ announcement. After that time the prizes will be reallocated if unclaimed.

– The prizes will be posted out directly from The Happy Egg Co.

Carrot, Cinnamon & Citrus Loaf

11/19

{AD} This week, I’ve partnered with Microplane to create a warming, autumnal recipe that incorporates some of my favourite seasonal flavours; carrot, cinnamon and citrus. This tasty loaf, topped with delicious cream cheese frosting and some sweet orange and lemon jelly slices, is quick and easy to make and sure to be a winner as the early evenings draw in.

To create this loaf, I’ve used with Microplane Master Series Zester and Microplane Professional Peeler and they made baking a breeze! The super sharp blades made light work of peeling the carrots, getting it done fast and effectively with minimal effort. Meanwhile the zester was by far, the easiest I’ve ever used. The oranges and lemon rinds were precisely cut meaning I got all of the tasty zest and none of the sharp, bitter pith that can really affect your baking. 

You can really feel the quality using these products and it’s east to see why Microplane are the grating specialist! I also love the backstory of Microplane;

“The big moment came in 1994, when a Canadian housewife was making an orange cake. Out of frustration that her grater was tearing and shredding, she commandeered one of her husband’s favourite woodworking tools from his workshop. The blade slid effortlessly across the orange and the zest fell from its surface like snowflakes. The discovery laid the foundation for the creation of Microplane® kitchen graters and an entire line of revolutionary graters was born.”

What can I say, as a Canadian myself, I can really get behind a Canadian idea. Haha! 

Check out the bottom of the page for details on how you can win your own Microplane Master Series Zester and Microplane Professional Peeler!

So now we have the right tools, let’s get baking!

Ingredients;

  • 150ml sunflower oil
  • 225g self raising flour
  • 150g light brown sugar
  • 200g grated carrots
  • 2 eggs
  • 60g chopped walnuts
  • ½ teaspoon bicarbonate of soda
  • 2 tsps cinnamon
  • 1 tsp mixed spice
  • Zest of 2 oranges
  • Zest of 1 lemon

Method;

  1. Beat the eggs briefly until mixed well.
  2. Add in the sunflower oil and light brown sugar and mix until combined.
  3. Mix in the grated carrots and the zests.
  4. Add in the self raising flour, bicarbonate of soda, cinnamon and mixed spice.
  5. Finally mix in the chopped walnuts.
  6. Pour into a lined and greased loaf tin and bake at 140C (fan assisted) for 1 hour 20 minutes.
  7. Leave to cool completely before frosting.


I think a cream cheese frosting compliments this bake perfectly but feel free to use any topping you wish. Buttercream would also work well.

Cream cheese frosting

Ingredients;

  • 180g full fat cream cheese
  • 50g unsalted butter
  • 500g icing sugar

Method;

  1. Beat the butter and cream cheese until soft.
  2. Add in the icing sugar and mix well.
  3. Once smooth, spread onto your loaf.
  4. Top with jelly orange and lemon slices (optional).

Once your cake is made, store in an airtight container. This bake will last 3-4 days. 

I’ve loved working with Microplane on this recipe. The peeler and zester are the best I’ve ever used. So sharp, making them so easy to work with but expertly designed so I never felt I was going to slice off my hand (which, I’d like to point out I’ve done MANY times when using generic graters for baking, maybe not sliced off my hand but hurt myself that’s for sure!).

For more about Microplane, check out their website here – http://microplaneintl.com

Happy baking!

Britt xo

COMPETITION DETAILS

For you chance to win your very own Microplane Master Series Zester and Microplane Professional Peeler 

The Facebook winner will be chosen at random from someone who likes my Facebook page http://facebook.com/shewhobakes and Microplane’s Facebook page https://www.facebook.com/Microplane/ and answers the competition question on my Facebook page. 

You may only enter once on Facebook.

Best of luck!

Britt xo

And now for the terms & conditions:

– The competition starts at 6pm on 22nd November 2019

– The competition closes at 9pm on 24th November 2019

– The competition is only open to UK mainland entrants.

– The winners can not transfer the prizes and there is no cash alternative.

– The competition is in no way sponsored, endorsed or administered by, or associated with Facebook or Instagram.

– The winners will be chosen at random and the decision is final.

– The winners will be notified within the week after the competition ends.

– The prizes must be claimed within a month after the winners’ announcement. After that time the prizes will be reallocated if unclaimed.

– The prizes will be posted out directly from Microplane International.

This is a paid partnership with Microplane. All views and opinions are my own.

Book Giveaway!

11/19

Competition Alert!

To celebrate World Book Day 2021, I’m giving away three copies of my book ‘Cakes, Bakes & Business’.

The book was released a few years ago and it was months of hard work which culminated in a full guide on how to start a cake business from home. I was and still am so super proud of it. A few days after it’s release it went to number one in two Amazon charts and it continues to help bakers around the world turn their cake making hobby into a career.

To celebrate World Book Day, I am giving away two signed copies.

So how do you enter?

The two Instagram winners will be chosen at random from someone who follows me on Instagram @brittmariebox and who has answered the competition question there and saved the post. “Liking’ the photo does not count as an entry. Comments only.
Best of luck!
Britt xo
And now for the terms & conditions:

– The competition starts at 1pm on 4th March 2021
– The competition closes at 10pm on 7th March 2021
– The competition is only open to UK mainland entrants.
– The winners can not transfer the prizes and there is no cash alternative.
– The competition is in no way sponsored, endorsed or administered by, or associated with Facebook or Instagram.
– The winners will be chosen at random and the decision is final.
– The winners will be notified within the week after the competition ends.
– The prizes must be claimed within a month after the winners’ announcement. After that time the prizes will be reallocated if unclaimed.
– The prizes will be posted on the 10th March 2021 by Royal Mail Second Class Signed For.

Happy Halloween 2019!

10/19

It’s the most wonderful time of the year….

As a self professed Halloween Queen, the time between September and November is the most magical for me. I love everything about it. From the crisp mornings to the falling leaves, the nights drawing in, all pumpkin everything and of course, Halloween itself.

My husband Tim and I throw an annual Halloween party and 2019 was our fifth year!

We decided on a Freakshow; Circus Of Horrors theme two days after our 2018 party and have spent the last 12 months stocking up on various red and white striped goods, clown decorations and anything else to decorate Boxes Freakshow.

We had a ticket booth entrance, the booth itself made by me and Tim a few weeks before the party, several skeletons and an eight foot mechanical clown we named Claude. The stairwell was a balloon bonanza and then upstairs itself was transformed into our very own Big Top.

For our costumes, Tim was the Ringmaster and I was The Bearded Lady. I had so much fun putting this look together and I was so pleased with how it turned out!

We also make lots of food, put on tasty snacks and sweet treats and I, of course, make a dessert. This year I went with all things circus to match our theme.

Here’s how it was made –

I wanted a three tier cake as I simply love how they look, but with 45-50 guests, it would be too much cake and it would go to waste, so I decided one of the tiers would be polystyrene. Then, imagine my delight when I discovered a Circus Tent shaped cake dummy. This would make up my top tier and the bottom two tiers were a deep 8″ chocolate and a deep 10″ vanilla. Both using my madeira cake recipe.

I wanted quite deep tiers do I baked one normal 3″ deep cake and then I halved the recipe and made an additional 1 ½” deep cake. I then split the normal cake into two and used the additional cake as another layer. Making up my traditional three layers of cake, two layers of buttercream inside to the cakes. I sandwiched them both with vanilla buttercream.

I also crumb coated the cakes with two layers of vanilla buttercream. I then placed the cakes on thick cake drums rather than cake boards, for extra height. I stuck them down with a little buttercream.

For the decoration, I used Renshaw Extra Sugarpaste in white as well as Renshaw red modelling paste mixed 50/50 with red sugarpaste and Renshaw black modelling paste. I cut out panels of the Renshaw Extra white and the red modelling/sugarpaste mix for the circuit tent dummy tier and stuck them on with piping gel. It was a case of holding baking paper against the dummy, drawing on it with pencil and then cutting those templates out of icing with a pizza cutter. A little bit of trial and error.

The black accents were a circle of black modelling paste cut in half for the top and a square panel stuck on the front for the entrance. I also finished the top tier with a red modelling/sugarpaste set of curtains, made by pleating the icing. It was finished with a red ball on top, edible gold balls, a little pumpkin made with a mould, painted gold and very thin red ribbon around the base.

For the middle tier, I iced this with Renshaw white extra and then, using a diamond cutter, cut out a LOT of black modelling paste diamonds using this cutter. I then stuck them all on, one by one, using a little edible glue. Once these were attached I then stuck on a LOT of edible gold balls in between. I then finished this tier with rolled balls of white sugarpaste around the edge.

The bottom tier was again iced in Renshaw white extra and then using a paper triangle template I made on my computer, I cut out 10 red triangles by hand using a pizza cutter. I wanted it to look like a circus drum. I stuck these on with a little edible glue and finished them with skulls made from Karen Davies marshmallow paste, painted gold using a paint made from edible gold lustre dust and rejuvenator spirit. I stuck these on with a little royal icing in a piping bag. I finished this tier with a very thin red ribbon around the base.

Once all of the cakes had set overnight, I dowelled them and then stacked them together using royal icing.

The whole cake was on a 13″ cake drum which I had iced red and had a 15mm black satin ribbon around the outside, stuck on with thin double sided sticky tape.

The cake looked great in the party surroundings and matched everything really well.

This wasn’t the only bit of edible decorating we did, however. Last September when we got married, Tim and his dad made us a doughnut wall and we really wanted to use it again for the halloween party. So we decorated four dozen doughnuts to match!

Original glazed Krispy Kreme doughnuts (because there was no way I was going to make my own as well as everything else we were doing), dipped in white chocolate, drizzled with red candy melts and finished with another marshmallow paste gold skull.


Check out last years cake here and 2017’s cake here and below for more pictures from this year’s Halloween party and have a look at my Instagram for all the videos including a full walkthrough of the party!

Happy Halloween!

Britt xo

Chocolate Fudge Cookies

10/19

{AD} Last Autumn I partnered with Bacofoil® to create a Salted Caramel, White Chocolate and Fudge showstopper cake to test out their Bacofoil® Non-Stick Baking Paper. Not only was it delicious, but it also worked incredibly well, with the cake coming away from the paper so easily. I was very impressed.

This year, I’m delighted to be working with them again but wanted to try something that would really put their Non-Stick Baking Paper to the test! I wanted to create a recipe that included super sticky ingredients, which after years of baking still catches me out and sticks to the paper – like my delicious chocolate fudge cookies.

  • Ingredients –
  • 250g dark brown sugar
  • 150g unsalted butter
  • 2 eggs
  • 1 tsp vanilla
  • 225g self raising flour
  • ½ tsp baking powder
  • 50g cocoa powder
  • 100g chopped fudge pieces (I’ve used Cadbury Fudge bars)
  • 100g dark chocolate chunks (plus a little more to top the cookie)

Method –

  1. Cream together the dark brown sugar and unsalted butter
  2. Add in the eggs and vanilla and mix
  3. Add in the self raising flour, cocoa powder and baking powder and mix
  4. Finally, mix in the chopped fudge pieces and dark chocolate chunks
  5. Spoon the dough onto some Bacofoil® cling film and wrap well.
  6. Chill in the fridge for at least 30 minutes or until firm enough to roll into balls (warning – even when firm, the dough will be sticky. If it gets too much to roll, wash your hands in cold water and try again).
  7. Push three dark chocolate chunks into the top of each cookie
  8. Chill again for 15 minutes
  9. Bake on Bacofoil® Non-Stick Baking Paper at 180C (fan) for 10 minutes
  10. Leave to firm up on the baking tray for 15 minutes and then transfer to a wire rack to cool completely

Once the cookies are baked, I like to leave them to cool on the baking tray until they have firmed up nicely and then transfer them to a wire rack to cool completely. If you try and move them to a wire rack too soon, because of their soft nature, they will likely break apart.

Having put Bacofoil®’s Non-Stick Baking Paper to the test again, I can honestly say it never fails! This is one of my stickiest recipes and the cookies peeled away from the paper with such ease. This product looks and feels different to standard baking paper as it has an innovative dimpled non-stick texture. This means the cookies have less contact with the paper’s surface area, resulting in an even bake and no sticking – the cookies maintain their shape and look amazing! Another advantage I love is that I don’t need to grease the tray and it saves me the hassle of washing up. 

Once baked and cooled completely, store the cookies in an airtight container. They will last for 4-5 days.

I loved working with Bacofoil® Non-Stick Baking Paper. It made making these cookies really easy and it’s such a great product I will certainly use again! It’s ideal for all kinds of baking jobs – lining, making and baking and for all types of food – savoury or sweet!

For more information about Bacofoil® Non-Stick Baking Paper and all of their products, check out their website www.bacofoil.co.uk

Happy baking!

Britt xo

This is a paid partnership with Bacofoil® Non-Stick Baking Paper. All views and opinions are my own.

Sign Up to my Newsletter

Subscribe here to my newsletter!

Designed by Clockwork Moggy
503 Service Unavailable

Service Unavailable

The server is temporarily unable to service your request due to maintenance downtime or capacity problems. Please try again later.

Additionally, a 503 Service Unavailable error was encountered while trying to use an ErrorDocument to handle the request.