Hello bakers,
Here is a step by step tutorial of how to make a Mini Cooper car cake! These basic principles are easily transferrable to any car cake.
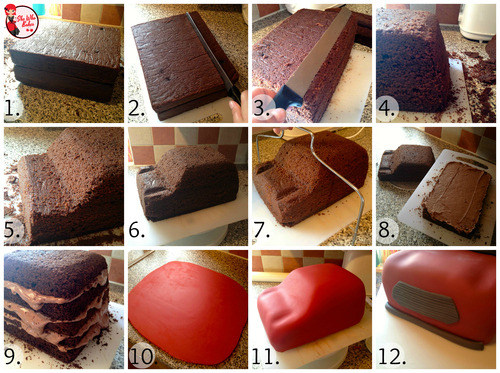
- Bake two 8 x 10 cakes and stack them straight on top of one another. I’ve used a chocolate madeira cake based on the recipe here.
- Cut a length off the side to make a better car width.
- Round off the corners.
- Carve the back of the cake in a slope for the boot.
- Carve into the front of the cake and slope down from the top to create the bonnet.
- Carve two indents into the bonnet to create the shape of the headlights.
- Split your cake into however many layers you would like.
- Fill your layers with your desired filling. I’ve used chocolate buttercream (recipe here)
- Stack your cakes back onto each other and leave to set. Then cover your cake in a thin layer of buttercream/ganache in a ‘crumb coat’.
- Roll out your icing to 5mm thick.
- Cover your cake with your rolled out icing smoothing it down with your hands as you go and lifting out any pleats and folds. Use smoothers to get a great finish.
- Add on your details with a little edible glue.

Step back and admire your awesomeness!
Give it a go and as always let me know how you get on via Facebook, Twitter or Instagram.
Happy baking (& decorating!)
Britt xo
If you want to turn your baking hobby into a career, check out my book Cakes, Bakes & Business for everything you need to know about running a successful baking business, including pricing, marketing, insurance and much more!