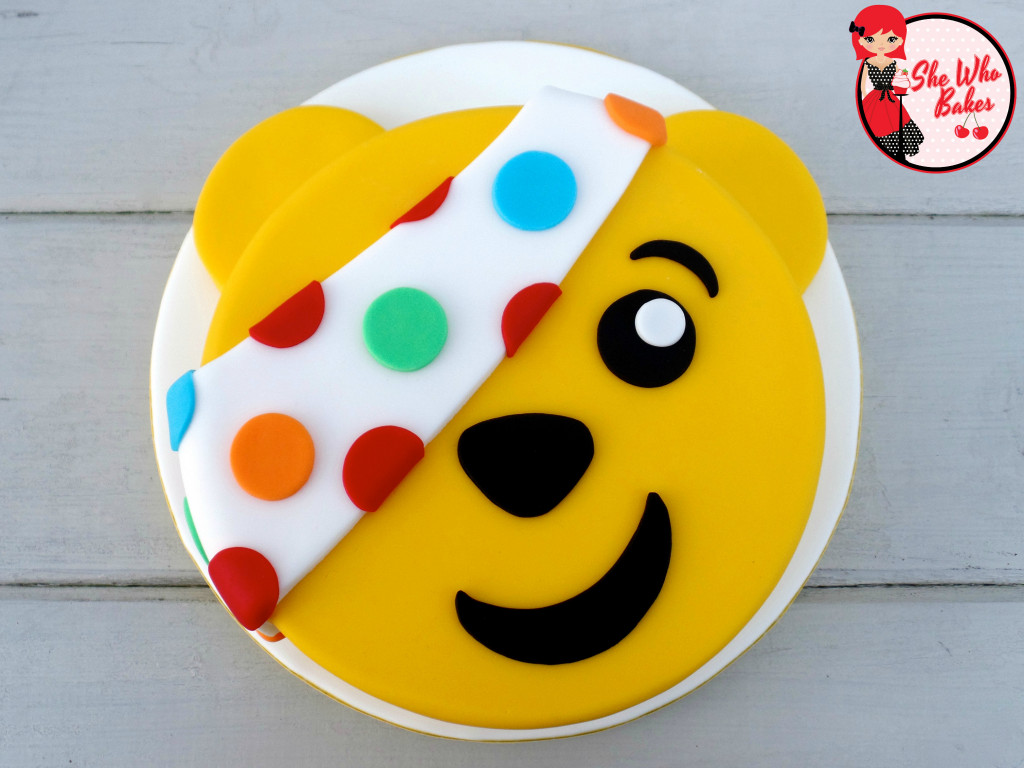
Happy 5th Birthday Pudsey!

11/18


This post is dedicated to a very special yellow bear. Now, I know what you’re thinking, it’s actually Pudsey’s 30th birthday this week with his first Children in Need appearance being way back in 1985, but I’m talking about a different Pudsey. I’m talking about an icing covered Pudsey mess that changed my life forever in 2010.

If you aren’t aware of the back story, let me set the scene. Back in 2005, my mother had died of Non-Hodgkins Lymphoma, a type of cancer. In the years that followed I had been diagnosed with depression, was put on very strong anti-depressants and after two (thankfully unsuccessful) attempts to take my own life, I realised I wasn’t living, merely existing. In 2010 I was recovering from an appendix operation after getting septicaemia when a friend asked if I would bake a cake for a Children in Need bake sale.

I had never successfully baked a cake before and, not wanting to give anyone food poisoning, I thought my best bet would be a packet mix. I bought a ‘Victoria sponge’ mix, a small block of yellow icing and a pack of squeezy coloured icing tubes. When I got into the kitchen, I realised I didn’t have a round tin so used the next best thing, a square roasting dish. It made perfect sense to me!

I followed the instructions to the letter and waited, Bake Off style, sitting in front of the oven. As I watched it rise, I realised I had been smiling the whole time. As back then my depression was at an all time high, this was unusual for me. But I didn’t question it, I just enjoyed it.

The alarm went off on my phone to tell me the cake was done. I put it on the side and let it cool for about 5 minutes before I simply couldn’t wait any longer and turned it out. I remember thinking it had dipped in the middle but didn’t know what that meant and just assumed that was how it was supposed to be! I rolled out the icing and couldn’t quite figure out how to get it onto the cake, in the end I guess I kind of… threw it on. I squished down the edges and caught it and nicked it so many times with my nails. The edges were cracking and the middle was sagging but it was on. I breathed a sigh of relief. I remember feeling ever so clever at cutting out his eye patch and sticking it down with water (that was a guess!) Then, as a finishing touch, squeezy tubes at the ready, I made his facial features and distinct colourful spots.

I stood back and looked at him. Pudsey. My Pudsey. I had felt so proud and happy and wonderful. I thought he looked amazing, perfect in fact. I wanted this feeling every single day.

Five years later and I can honestly say every time I turn on my oven, every time I go to my ingredients cupboard, I still get the same feeling now as I did on that day. Whenever I look at my Pudsey cake, I still feel overcome with pride. That cake started something very special.

So, as fitting on his fifth birthday, I decided to recreate Pudsey. I wanted to make him exactly as I saw him that November afternoon. As my way of saying thank you. I owe a lot to that cracked icing, raw mixture, inedible, wrong-shaped cake. So, happy birthday Pudsey. Here’s to many more years.

See the video below for my TEDx talk where I tell my story in full and Pudsey gets a staring role.

Britt xo
Pusey 2015


Bonfire Cupcakes

11/18

These Bonfire Cupcakes are super simple to make and look really effective! Perfect for a bonfire and fireworks night! A step by step video on how to make these is below.

For this, I’m using my flat topped chocolate cupcakes which are perfect for decorating. You can find the recipe here.

I’m using brown cupcake cases and concentrated Sugarflair food colouring in Red Extra, Tangerine and Melon. Also my open star nozzle is a 1M and using large disposable piping bags. All equipment is available from Iced Jems.

You will need;

  • 12 cupcakes
  • 250g unsalted butter
  • 500g icing sugar
  • Matchmakers (I’m using the orange ones)
  • Red, orange and yellow food colouring
  • Piping bag
  • Open star nozzle – 1M

Method;

  1. Cream the butter for a few minutes
  2. Add in the icing sugar and mix well
  3. If flavouring your buttercream, put the flavouring in now
  4. Divide the buttercream into three bowls
  5. Colour the buttercream red, orange and yellow
  6. Fit a piping bag with an open star nozzle
  7. Put the piping bag into a stand or pint glass
  8. Fill with all three colours
  9. Squeeze down the buttercream and twist the bag at the top to stop buttercream coming out
  10. Starting in the middle of the cupcake, squeeze out a large star shape
  11. Then, from the outside squeeze the buttercream out and go around the outside of the star twice and into the middle
  12. Stop squeezing and pull away
  13. Using halves of Matchmakers press them into the sides of the buttercream swirl to create a ‘bonfire’ look

Store in a cool, dry room in a cake/cupcake box and enjoy within 2-3 days!

If you want to turn your baking hobby into a career, check out my book Cakes, Bakes & Business for everything you need to know about running a successful baking business, including pricing, marketing, insurance and much more!

Give it a try and let me know how you get on either on Facebook or Twitter or Instagram.

Happy baking!

Britt xo

How To Make A Bonfire Cake For Fireworks Night

11/18

This is my favourite time of the year! From Halloween, comes Bonfire Night, leading up to Christmas! The best are months in my opinion. This Bonfire Cake is simple to make and fantastic to look at, making it the perfect show stopper to make for your parties this season! Click here for the tutorial on the matching cupcakes.

I have used my chocolate madeira cake recipe but feel free to use any flavour you like! I would recommend using a strong and stable cake that is suitable for carving and stacking, which is what a madeira is perfect for.

The models and decorations (Guy, hedgehogs and leaves) can be made ahead of time. Use modelling paste for stability and keep in a cake box or another container that the air can get to (not in a sealed box, otherwise they may melt). For more on types of icing, check out my blog post here.

Once baked and decorated, this cake will last 4-5 days. Make sure to properly crumb coat so no air can get into the cake and make it dry. You can read more about my cake timelines here.

Equipment

  • Wilton Wonder Mould Tin/7″ round tin
  • 8″ round thin cake card
  • 11″ round drum
  • 1kg orange sugar paste (For the board)
  • Brown, yellow, peach, orange, black and white modelling paste
  • Paintbrushes
  • Edible glue
  • Small palette knife
  • Small piping nozzle
  • Large rolling pin
  • Icing spacers
  • Royal icing
  • Cornflour
  • Small circle cutters
  • Brown and white dust colours
  • Rejuvenator spirit
  • Paint palette
  • Leaf cutters & veiners
  • 4 packs of Matchmakers
  • Chocolate buttercream
  • 1 meter 15mm brown ribbon
  • Double sided tape
  • Small rolling pin

For the board

Paint your board with water.

Knead your orange sugarpaste until it’s a workable consistency. If the icing is sticky or your hands are very warm, sprinkle lightly with cornflour. Lightly dust your smooth work surface also to prevent it sticking.

Roll out your sugar paste to a 1/4 of an inch thickness. If it helps, you can use icing spacers which are perfect for this.

To keep the sugar paste from sticking, lift and move it around as you roll. Add more cornflour if needed.

Gently lift icing over rolling pin to move and lower it onto your damp board and push down to secure. Cut around your board with a sharp knife to remove the excess icing. Apply double sided tape to the outside rim of the board and stick on your 15mm brown ribbon.

For the cake

Bake your favourite chocolate madeira (you can find my recipe here) in either a Wilton Wonder Mould Tin or two 7″ round cakes, stacked and carved into a pyramid shape. Cut a small ledge into the front of your cake for your ‘Guy’ to sit.

Split and fill your cake with your desired buttercream or ganache and secure your cake to the thin board using buttercream.

Lightly coat your cake with buttercream or ganache.

Fix this to your cake drum with a little royal icing.

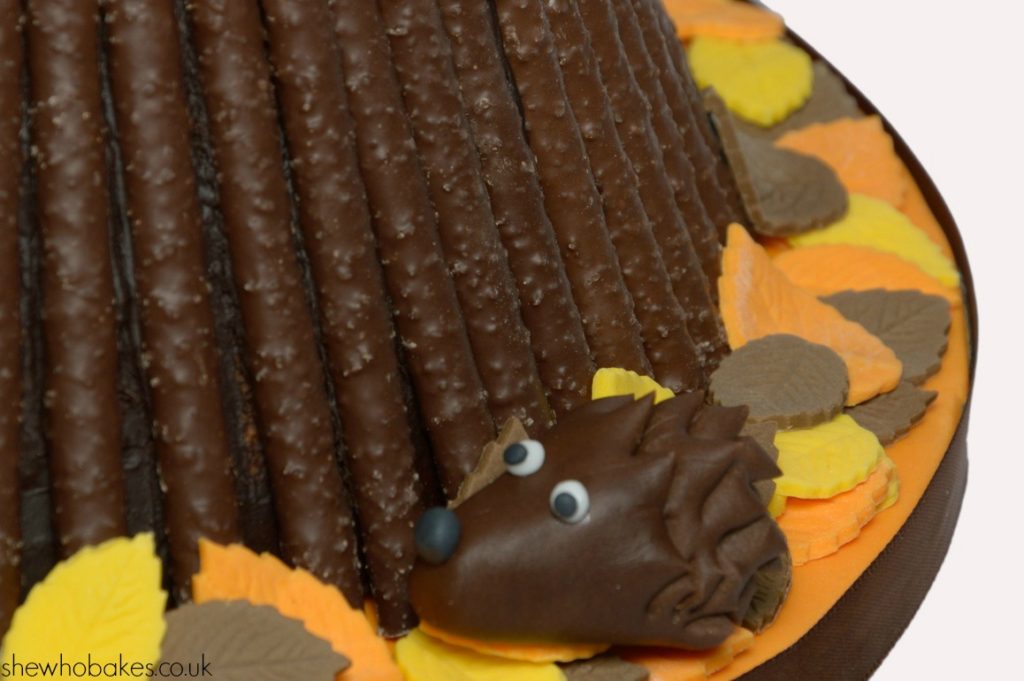
Starting at the back, apply your Matchmakers to your coated cake in the style of a bonfire. Continue all the way around and add a second layer on top. Then fill in any gaps you may have with smaller cut pieces of Matchmakers.

bonfire-2

For the leaves

Roll out your yellow, brown and orange modelling paste and cut out lots of different sized leaves. Shape these if desired by twisting them around a cocktail stick and leave to dry on foam. When these are dry, stick onto your cake using a little edible glue.

For the hedgehogs

Roll balls of brown modelling paste and shape and pinch the front into a cone. Using small scissors, snip into the back of the hedgehog to create the spikes. Roll two small white balls of modelling paste for the background of the eyes. Roll three small balls of black modelling paste and glue into place for the middle of the eyes and nose.

bonfire-1

For the Guy

Roll a thick sausage of brown modelling paste and cut up the middle 3/4 of the way. Round off the bottoms of the two halves. These will be the legs. Bend the legs onto a thick piece of foam so it is ‘sitting down.’ Leave this to dry.

Roll a ball of yellow modelling paste and shape into a thick teardrop. This will become the torso. Mark a line down the middle with a small palette knife and indent ‘buttons’ using a small piping nozzle. Leave this to dry.

Roll out a square of brown modelling paste, not too thin and shape this around the torso shape to make the back and collar of the coat. Apply with a little edible glue.

Roll two sausages of brown modelling paste and affix to the outside of the coat to create the arms. Then wrap a small strip of brown modelling paste around the bottom of the arms to create cuffs. Apply with a little edible glue.

Roll two balls of black modelling paste and flatten them to become shoes and stick these to the bottom of the legs. Then wrap a small strip of black modelling paste around the bottom of the legs/top of the shoes to create boots. Apply with a little edible glue.

Roll two smaller balls of black modelling paste and again, flatten slightly. Cut into the side to create a ‘thumb’ and shape the rest of the ball to become a ‘glove’. Repeat with the second ball and apply with a little edible glue.

Roll a ball of peach modelling paste for the head and leave to dry. Once dried, apply a smaller ball of peach modelling paste to the front of the face to become the nose. Roll a small sausage of brown modelling paste and apply under the nose to create the moustache, make some hair lines in the moustache with your small palette knife.

Paint on the eyes and eyebrows using dust colours mixed with a little rejuvenator spirit. Roll out two strips of brown modelling paste and affix to the sides of the head to create hair. And finally roll out a large circle of brown modelling paste and a thick smaller circle of brown modelling paste and affix to the top of the head to create the hat.

Roll out a long strip of yellow modelling paste and lay strips of brown modelling paste horizontally across. Roll over it all again to create the striped scarf effect. Cut to size to fit your guy and apply with a little edible glue.

Give it a go and let me know how you get on, either on Facebook or Twitter or Instagram.

If you want to turn your baking hobby into a career, check out my book Cakes, Bakes & Business for everything you need to know about running a successful baking business, including pricing, marketing, insurance and much more!

All of my Online Cake Decorating Courses are currently 50% off! Grab a bargain here.

Happy baking!

Britt xo


Sign Up to my Newsletter

Subscribe here to my newsletter!

Designed by Clockwork Moggy