Renshaw Microwave Fondant Icing | A baking review by She Who Bakes

02/16

Renshaw Microwave Fondant Icing. I first saw this stuff on Twitter last week and was very curious indeed.

I did a little research and found this information on the Lakeland website;

Forget the ‘perfect’ finish – if you’re after on-trend, colourful drips and splashes, get the look with Renshaw’s range of pour-over fondant icing. Simply heat in the microwave, stir, then drizzle, feather and flood over your cakes. In a host of tasty flavours, they’re great for dipping biscuits too – and for making your very own fondant fancies.

Skip forward a few days and a successful Bluewater trip later and I have it in my possession! I had some left over dough from my Giant Jammie Dodger recipe so I’ve made some heart biscuits as my test subjects!

They nearly didn’t make it to the testing arena, mind. I told Tim what I was doing to which he replied “OH! I nearly ate those biscuits earlier. You should have said.” It seems tasty treats in my kitchen need to be nailed down or they risk being scoffed!

First Impressions

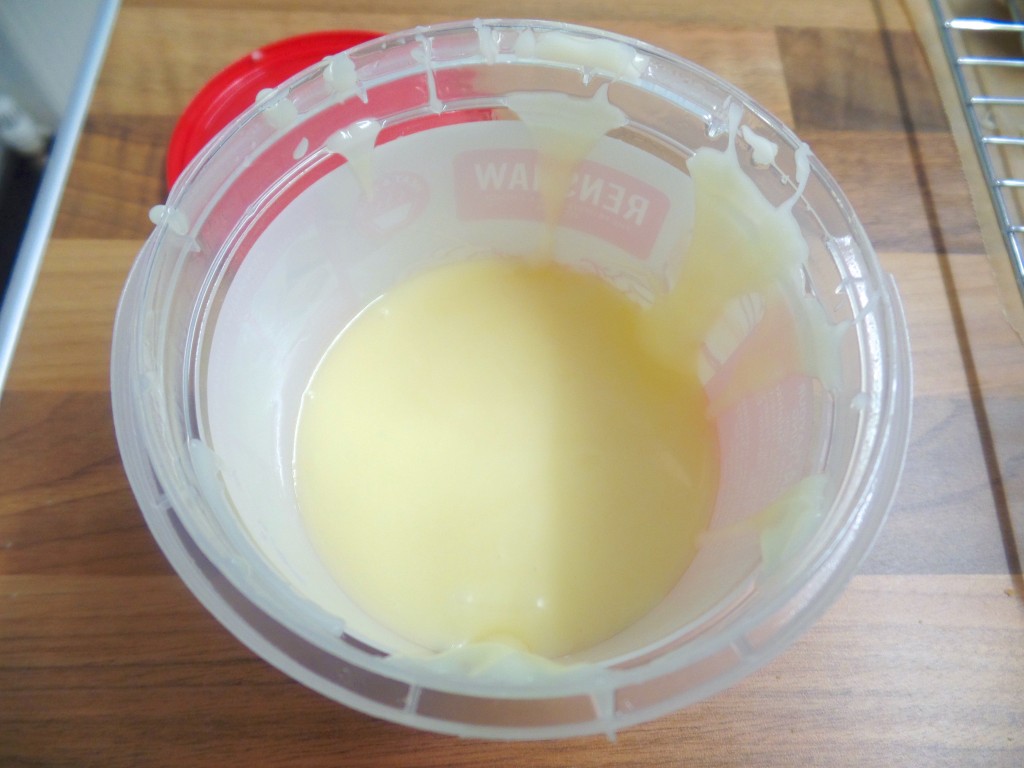
It’s nicely packaged and has a distinct red branded lid in uniform with other potted Renshaw products, like their ready to use Royal Icing and Colour Melts.

At £2.48 for 400g, it’s more expensive than buying fondant icing sugar to make up yourself, but it’s already flavoured and at the right consistency to use so I can see why it would be popular on the shelf. The full flavour range includes: Chocolate, Lemon, Vanilla and Caramel.

I’ve bought the vanilla flavour to try today.

Trying It Out

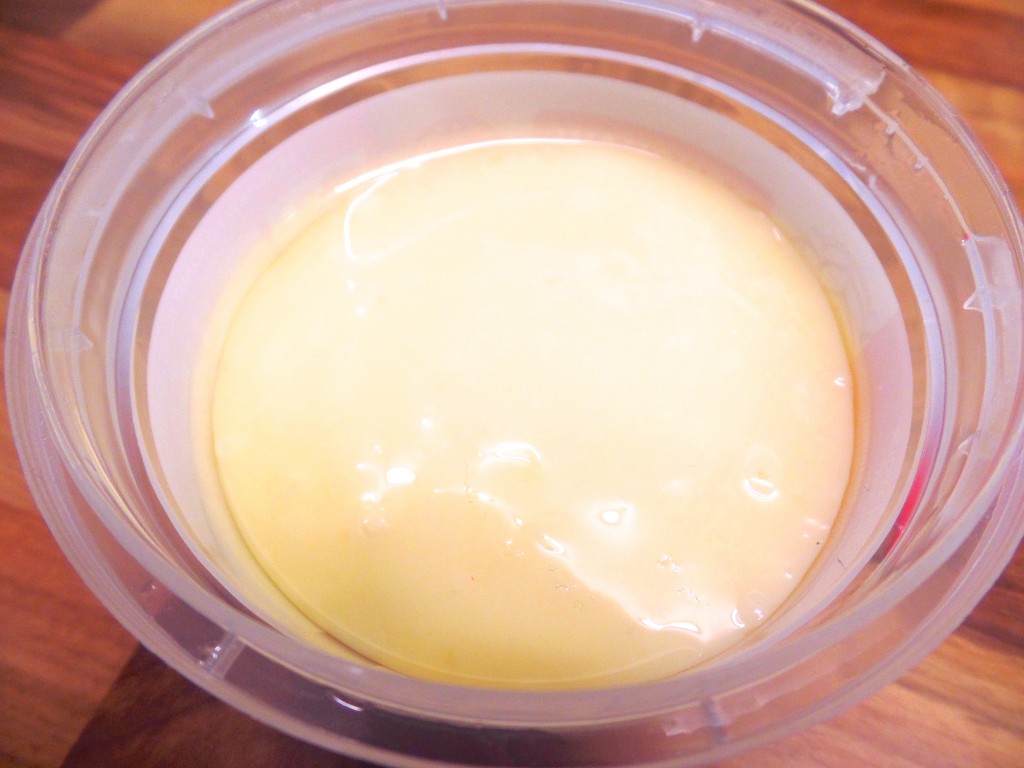
The instructions are clear; “Remove lid and heat on full power for 30 seconds, then stir for 30 seconds. Hey for a further 15 seconds and sir until fully combined.”

After heating it for the time stated, it still looks rather thick to me. It also has on the back; “If a thinner sauce is required, heat for a further 15 seconds” so I opt for this.

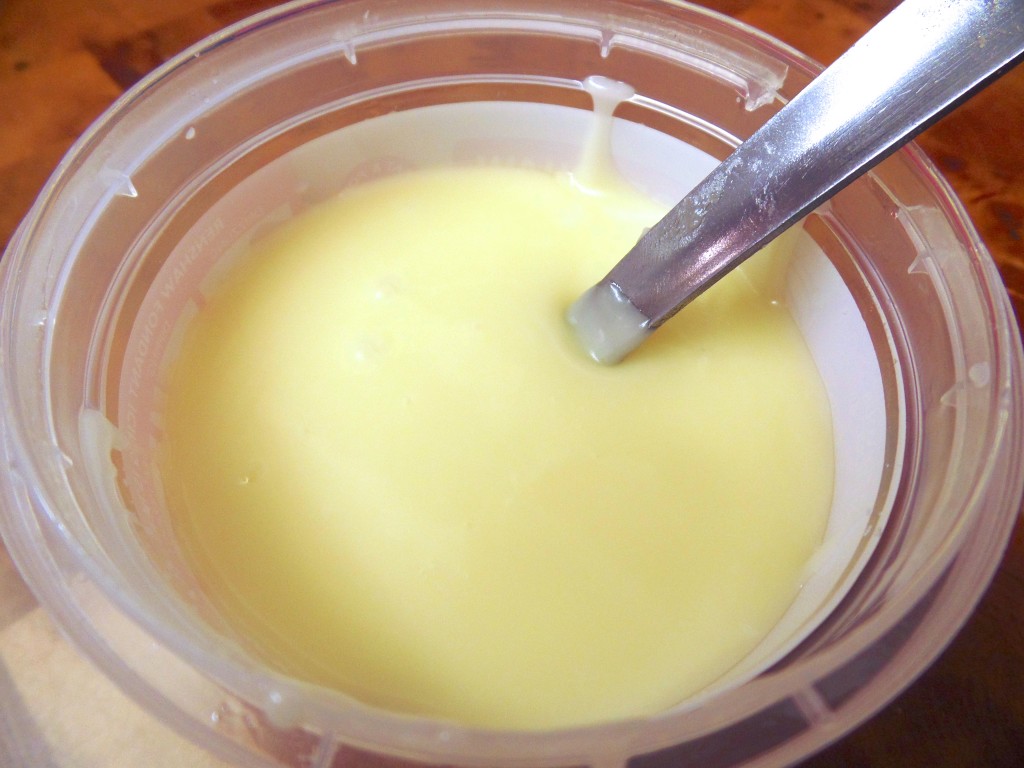
I do notice that it smells VERY sweet. Not like the slightly ‘alcohol’ smell a vanilla pod would give off, but a sugary sweet smell. (Not very shocking, I mean it IS sugary fondant icing after all…)

I hadn’t really thought about what design to do on my biscuits so I go with my instinct!

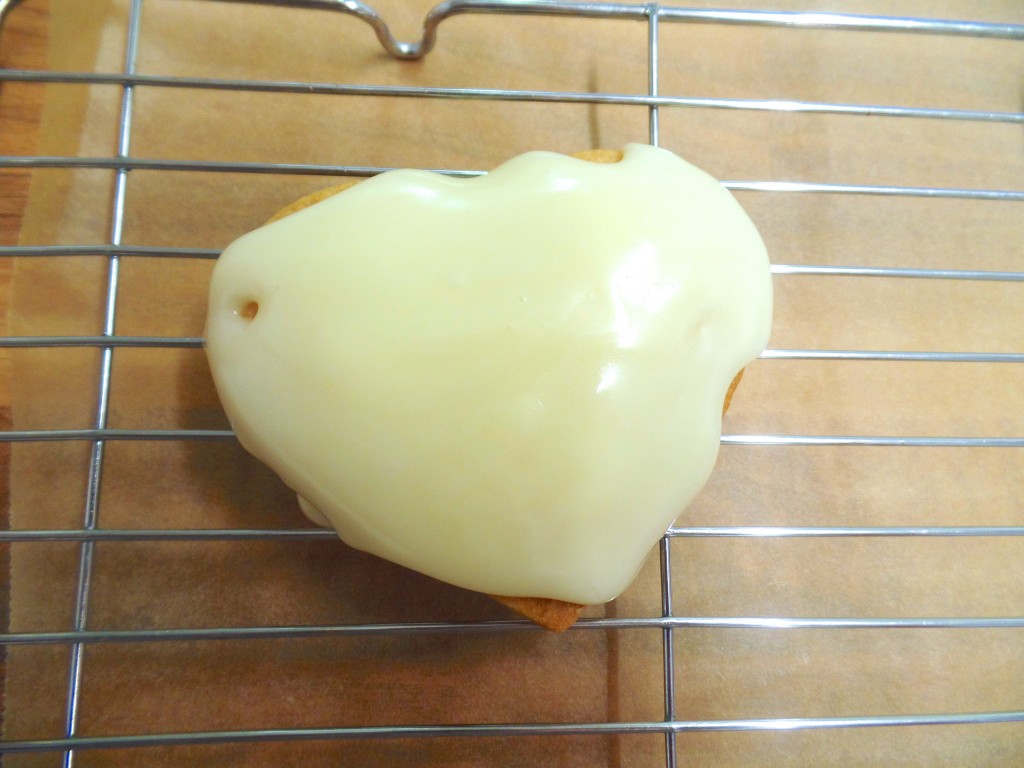
The first two, I decided to flood. I pour on the fondant icing and it’s still really thick. I can get a nice covering though by giving it a bit of gently persuasion with the back of my spoon.

The next two, I decided to drizzle. This was slightly tricky as it’s not the best consistency for drizzling, so I let the fondant icing fall off the spoon, back into the pot for a few seconds before going back and forth over my biscuit. It looks quite cute and I’m pretty pleased with it. I then decided to do a thinner, criss cross drizzle. If you work quickly using a little bit on the spoon, it’s easy to create this style.

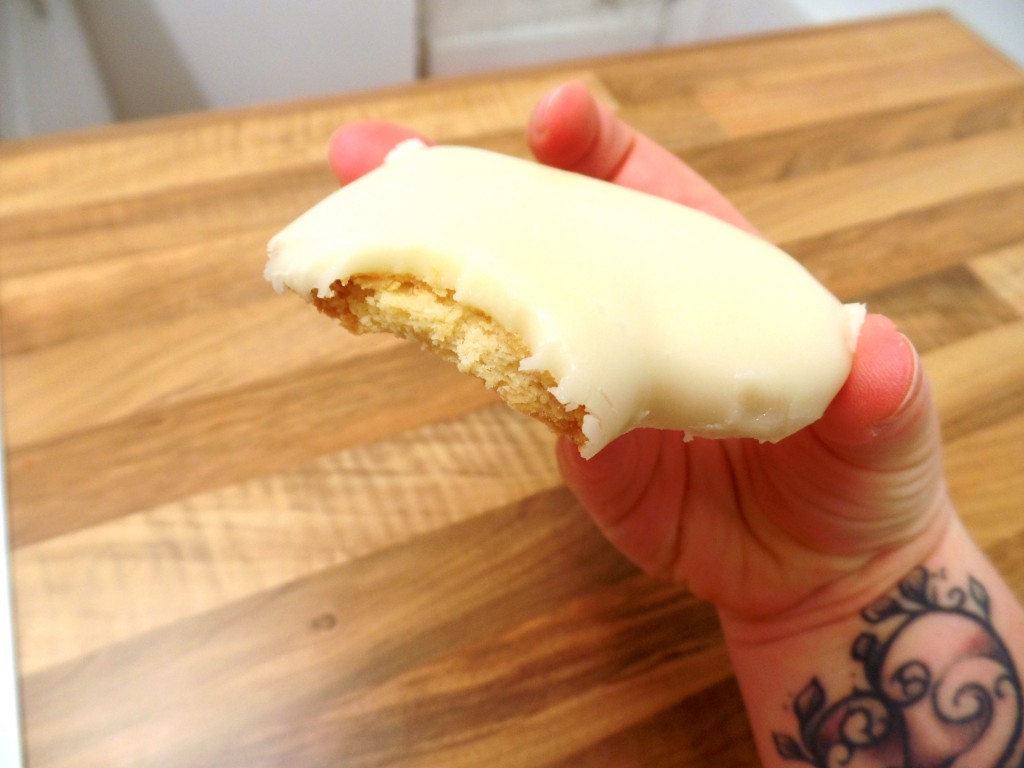
The last two I decided to dip. By having a strong biscuit, I could easily plunge it into the fondant icing and back out again, but I wouldn’t fancy my chances dipping cake into this. I think the cake would break apart unless it was frozen.

If you want to sprinkle your biscuits, you’ve got to be quick! By the time I decided to sprinkle these and get my decoration out of the cupboard, the fondant had almost dried too much for the sugar to stick. Luckily I was just in time for a few to stay on but bear that in mind; if decorating with sprinkles or sticking on other decorations, do it as soon as you’ve covered/dipped the biscuit.

I left them on the cooling rack to dry and it took only a few minutes to become ‘touch’ dry but about an hour to fully set.

I have decorated 6 large biscuits and used about half a pot.

Verdict

The Renshaw Microwave Fondant Icing was easy to prepare in the microwave and really easy to use.

In less than a minute I have fondant icing ready to pour. A few of my recipes call for fondant icing, (such as my Lemon & White Chocolate Slices) and I know from making that, it can take a lot longer to get a liquid fondant icing by using the standard fondant icing sugar, water and flavouring.

It’s a little on the thick side in consistency but that is easy to fix with a bit longer in the microwave. I would be interested to test out the other flavours to see if they are as thick. It tastes super sweet too.

I like it! I’d say this product would be great for using at home with the kids, and if I needed a quick decorating fix to flood some cupcakes or drizzle on biscuits, I would totally buy this again!

You can buy this from Iced Jems here.

Have you used it yet? What do you think?

As always, let me know how you get on, either on FacebookTwitter or Instagram and make sure to subscribe to my YouTube channel where you can check out my latest videos!

Happy baking,

Britt xo


Scraper Mixer Pro by Sage & Heston Blumenthal | A Review by She Who Bakes

02/16

2017 UPDATE

Unfortunately this mixer is no longer being sold which is a shame as I really like it. Having spoken to Sage they have advised me there are two alternatives to it –

Scraper Mixer RRP £249.95: https://sageappliances.co.uk/collections/mixers/products/the-scraper-mixer-pro?variant=40454818948

And the Bakery Boss, RRP £399.95:https://sageappliances.co.uk/collections/mixers/products/the-bakery-chef?variant=40399794884

I cannot, however, advise what either of these mixers are like as I haven’t used them. That being said, I believe the Scraper Mixer is pretty similar to the one I use and have reviewed below.

________________________________________________________

This week, I’m reviewing the Scraper Mixer Pro by Sage & Heston Blumenthal.

Scraping down the bowl is a necessary evil when it comes to baking the perfect cake. If you forget, as I have done many times in the past, you pour your mix into your lined tin and… what’s that? A lump of flour/butter/sugar that simply hasn’t been fully incorporated. This mixer claims to eliminate those problems once and for all by taking away the need to scrape down the bowl.

How? The answer is actually quite simple and also rather brilliant. One of the attachments included in the box is a scraper beater. A normal beater with plastic, flexible edges to scrape the sides of the bowl as it mixes.

So, let’s take a closer look.

Scraper Mixer Pro Attachments

As well as the scraper beater, the Scraper Mixer Pro also comes with a wire whisk, a flat beater, a dough hook, a splash guard and a spatula. These are the kind of attachments you can expect to find with a premium mixer like this one, however, one aspect I think is really rather clever, is that there is a guide on the inside of the mixer telling you what attachment to use for what recipe. I know for a fact that when I first started, I used my one flat beater and the rest stayed in a drawer untouched. I had no idea what to do with them and when it was appropriate to use them. Granted, this information would have possibly been inside the instruction manual but I’m the WORST for putting those away, never to see the light of day. I thought the visible guide was a nice touch.

I LOVE a kitchen gadget and two features of this mixer I was particularly fond of were the electronic speed control and countdown timer.

Instead of having speed numbers on the side, there’s specific speed settings including folding & kneading, light mixing, creaming & beating, aerating and whipping and pause. This lights up and not only looks pretty, but is really rather practical.

The timer lights up as well, making you feel a bit like you’re on the space station. (I assume, I’ve never been…)

In fact, there’s quite a ‘spacey’ theme throughout the mixer, from the stainless steel grey, curved ergonomic aesthetic and pretty lights, I feel Matt Damon would be happy with this one.

There is a tilt release button on the top and also a handle on the front. This is rather cool as I’ve ended up getting mixers covered in cake by manhandling the top section to lift it.

Another thing I liked, was the internal cord storage. If there’s too much cord on show, you can simply push it back in! Really good for when you are tidying away.

Putting It To Work

So, it looks pretty and has some great functions. Let’s put it to good use. As soon as there is power to it, the timer comes on and the lights flash up the side to let you know it’s awake.

I fill the 4.7 litre bowl with cake mix and start it on the ‘folding’ setting. Then I switch it up to the ‘light mixing’ setting. It’s fast. With a 1000W motor, and Planetary Mixing Action, it replicates a similar mixing action used by commercial mixers in bakeries. The planetary mixer achieves 360 degree coverage around the bowl for evenly mixed batter, creamy icing and pliable dough.

It was also a lot quieter than I thought it was going to be, (which is really handy as my kitchen is right next-door to Tim’s office!) even on the highest setting. It also has internal sensors, which detect when heavy batters are being mixed and automatically adjusts the power to maintain the selected speed. Kind of like a gear change!

As you can see, it was scraping all of the butter down as it went round. By the time I was done, the mixture was light,  fully incorporated and I didn’t have to scrape the bowl down mid-mix once. Very cool!

It’s got some great functions that I haven’t seen on other mixers and with an RRP of £299.99 and 2 Year Repair Warranty with 5 Year Motor Warranty, it’s an investment for your kitchen.

All in all, I like it! I think it looks good and it does good. Definitely a contender if you’re in the market for a new stand mixer.

Check out my Unboxing Video of this Scraper Mixer Pro on my YouTube channel.

As always, let me know your thoughts, either on Facebook, Twitter or Instagram!

Happy baking!

Britt xo

Mixer provided by Sage Appliances to review, but my views are my own, impartial and honest.

New – Online Classes

02/16

Oh wow! I’ so excited to share the news with you!

I am now offering brand new online classes for three of my most popular topics; Professional Finish, 2D Carved Owl Cake and Pretty & Pink Cupcakes!

The classes are filmed in sections so you can pause, rewind and re-watch as many times as you like!

I take you through the process of making these beautiful cakes!

All information and classes can be found on the brand new Online Classes section of my website, or click the pictures below to be taken to that specific class!

Happy baking!

Britt xo

Professional Finish Cake Decorating Online Class

2D Carved Owl Cake Online Class
Pretty & Pink Cupcakes Online Class

I proved them all wrong…

02/16

This is just a short, heartfelt blog post on a rather important milestone in my life, and one that a few years ago, I thought I would never see.

After being medicated for most of my adult life I’m thrilled to say that today marks two years being off any and all anti-depressants.

After mum died, I was told I would be on strong medication for the rest of my life, just to be stable and to be able to carry on.

I proved them all wrong.

Through my baking, my blogging and the love and support from my friends, loved ones and my darling Tim, I have never been happier. The last eleven years have been hard and I’ll be honest, I didn’t think I would make it out alive.

But here I am. Stronger than ever. I know my mum would be smiling today.

Thank you to everyone reading this for your constant belief and support in me.

Love, Britt xoxo

You can read my full story here – Baking My Way Out Of Depression.

Sign Up to my Newsletter

Subscribe here to my newsletter!

Designed by Clockwork Moggy