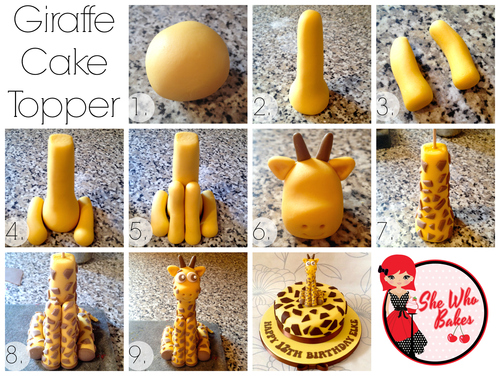
Here is a quick photo tutorial on how to make a Giraffe cake topper!
- You need a ball of yellow modelling paste.
- Break off a third to make the body, roll the top two thirds into a sausage shape and create a base.
- Roll two sausages for the legs and shape them. Do the same for the arms.
- Hold them against the body to check the size but don’t stick them on yet.
- Do the same with the arms.
- Roll a small ball for the head, elongate the front to make the nose. Use a smile tool and cel stick to make the face markings. Make to small triangle shapes for the ears. Use a small piece of brown modelling paste to make the horns.
- Stick a cocktail stick into the body to support the head. Roll out brown modelling paste and cut irregular shapes to make the giraffe markings. Stick these on with a little edible glue.
- Repeat the same markings on the legs and arms, including small brown circles for the bottom of the legs and arms.
- Glue the head on, continuing the markings on the side of the head. Cut two small white circles, two smaller brown circles and very small white balls for the eyes.
Happy baking!
Britt xo

